Organisation
The Administration|Organisation screen is a select screen that allows you to select the specific Organisation Type to be viewed or maintained. Below is the screen as initially displayed but with the Organisation Type pull-down list showing.
Note that if you do edit Administration|Organisation items (say to change an email address), then the new values will not become available until the next time you log on (because these organisation settings are fetched once at logon time to improve performance).

Each Type has its own view/edit screen.
The buttons are as follows:
| New | create and edit a new instance of the selected type |
| Edit | edit the selected instance |
| Delete | delete the selected instance |
| Synchronise Insurers | only applicable when the selected instance is an Insurance Service. Adds, updates or deactivates insurers managed by the Insurance Service. |
Deposit Accounts
This screen is used to create/edit/view the details of the bank accounts in which takings are deposited via the Reporting|Till Balancing|Deposit processing. Most of the fields are used to provide the information to print on the Bank Deposit document obtained using Reporting|Till Balancing|Print.

The fields are as follows:
Name - the name of the Deposit Account
Account Name - the name in which the account is held
Bank - select the bank from those available in the pull-down - see Lookups|Bank
Branch - the name of the branch
Account Number - the account number
Last Deposit - the date on which the last deposit was made (this is updated by the system when the Till Balancing|Deposit processing is done)
Active - uncheck this box to deactivate the account
Locations Tab - used to set the Practice Locations for which this Deposit Account is available. Note that multiple locations can be set, but not repeated - ie an error will occur if you attempt to add one location twice
Select
This is the screen used to select a Deposit Account. It works like a standard select screen.
Insurance Service
This screen is used to create or edit an Insurance Service.
Insurance Services are provided by plugins and the available fields are defined by the Insurance Service provider.
Please contact your Insurance Service provider for a description of the fields.
Mail Server
Mail Server is used to configure email server settings to enable OpenVPMS to send emails.

The fields are as follows:
| Name | The server name | ||||||||
| Description | The server description | ||||||||
| Active | Uncheck this to prevent emails being sent | ||||||||
| Host | The server host name | ||||||||
| Port | The server port | ||||||||
| Username | The server user name | ||||||||
| Password | The server password | ||||||||
| Security | Set to None, SSL/TLS, or STARTTLS as required by your email provider. The standard setup is:
|
OTC
This screen is used to create/edit/view the OTC accounts. See also Concepts|OTC - Over The Counter.
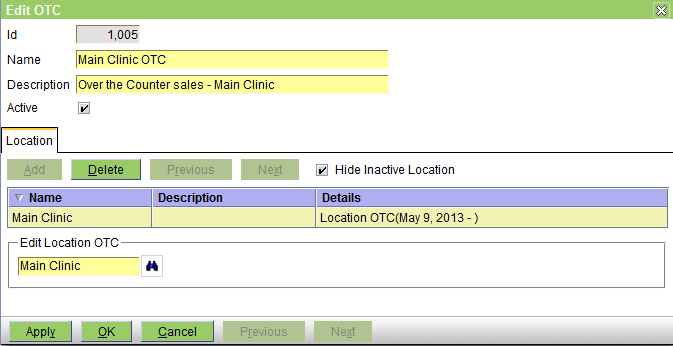
The fields are as follows:
Name - the name of the OTC account
Description - serves to clarify the name
Active - uncheck this box to deactivate the account
Locations Tab - used to set the Practice Locations for which this OTC account is available. Note that multiple locations can be set, but not repeated - ie an error will occur if you attempt to add one location twice
Select
This is the screen used to select an OTC account. It works like a standard select screen.
Practice
This screen is used to create/edit/view the Practice. Note that you can only have one active Practice at a time.

The fields are as follows:
Practice Name - the name of the practice. This will appear on various reports and documents so it should be set as you want it to appear.
Active - uncheck this box to deactivate the practice
Currency - select the currency to be used - see Lookups|Currency
Patient Age Format - select the required format - see Lookups|Duration Formats. If you leave this set at None, default settings apply - see Lookups|Duration Formats.
Prescription Expiry - the default interval for how long prescriptions are valid - see Concepts|Prescriptions
Reminder Export Format - this determines the file format when exporting reminders on the Reporting|Reminders screen - it can be set to None, Comma or Tab separated values.
Auto Lock Screen - this determines how long a user's session may remain inactive before a dialog is displayed prompting the user to re-enter their password. A value of 0 disables this feature. Note that due to the way the client browser is refreshed, the dialog may be displayed up to 30 seconds after the specified period of inactivity.
In order to prevent auto-lock, you need to periodically do something that triggers synchronisation with the server. This resets the auto-lock timer. Things that trigger synchronisation include:
- pressing Enter in a field
- clicking a button (e.g. Apply)
The following will not trigger synchronisation:
- inputting text without pressing enter
- moving the mouse
- pressing tab
The reason for this is to limit the amount of network traffic between the browser and the server.
Auto Logout - this determines how long a user's session may remain inactive before the user is automatically logged out.
Show Problems in Visit - if selected, a Problems tab will be displayed in the Visit Editor. By default, it is unselected.
Ignore List Price Decreases - if selected, then if the Auto Price Update option is checked on the Product's Supplier tab and the calculated cost price is less than the existing cost price of the product, then no Auto Price Update will be done.
Log Communication - if selected, communication with a customer will be automatically logged. See Communication for more details.
Record Lock Period - the period of time after a patient medical record is created that it is locked from editing. Setting a value <= 0 disables locking. Changing this value will log an Audit message. Enabling it will schedule a job to periodically lock records. See Medical Record Locking for more details.
Minimum Quantities - used to reduce charging errors, by ensuring that a product has a minimum quantity.
When enabled, product template and estimate Low Quantities set a mininum quantity for a product. When expanding a template into an estimate or charge, the low quantity of the included product becomes the minimum quantity for an item. When invoicing an estimate, the estimate low quantities set the minimum quantities on the invoice.
- For estimates, an item is invalid if its Low Qty is less than the minimum quantity
- For charges, an item is invalid if its Quantity is less than the minimum quantity
If an item has a minimum quantity:
- it cannot be swapped for another product, if it is a service
- it can be swapped for another medication, if it is a medication
- it can be swapped for other merchandise, if it is merchandise
- it can be deleted, subject to the Override.
This specifies the type of user that may delete items with a minimum quantity. If unset (i.e. None), items may be deleted, but a warning will be displayed. If set, only users with the specified user type may delete the item.
When Override is set, users with the specified user type can override minimum quantities.
Show Prices Tax Inclusive - determines if fixed and unit prices in Products - Information and during product selection should be displayed inclusive or exclusive of tax.
Use Location Products - if selected, products used in charges, estimates, investigations and reminders are restricted to those available at the current location. This is useful for multi-location practices where not all products are available at each location. For:
- medication and merchandise products, this excludes products that don't have a Stock Location relationship, ie there has never been stock of the product at the stock location for the current practice location
- service and template products, this excludes products that are specifically set as not being available at the location. By default all templates and services are available at all locations. To set the 'not available at' locations for specific templates and services, use the Locations tab on the Product Information screen (which is only displayed if 'Use Location Products' is checked).
Follow Up At Checkout - check this box if you want to pop up a new task editor at check-out to optionally create a follow up task for the patient.
Use Logged In Clinician - determines how Clinician fields are populated. When:
- selected, Clinician fields default to:
- the current user, when the logged in user is a clinician; else
- the workflow clinician or the last selected clinician, when the logged in user is not a clinician
This is the preferred choice.
- unselected, Clinician fields default to the workflow clinician, or the last selected clinician
Only use this if workstations are shared.
Short User Name Format - specifies the format for user and clinician names in reports. Defaults to the user's name.
Medium User Name Format - specifies the format for user and clinician names in printed Medical Records and Problems, Appointments and Tasks, and Drug Labels. Defaults to the user's title and name.
Long User Name Format - specifies the format for user and clinician names in Estimates and certificates. Defaults to the user's title, name and qualification.
Restrict Ordering - when selected, supplier orders can only be finalised by a clinician. This can be used in jurisdictions that require restricted drug ordering to be limited to clinicans.
Service User - the user responsible for background services. Required by the HL7 services to update outbound messages.
Mail Server - the default email server. This is used:
- by the email-to-SMS gateway
- when no Mail Server is specified on a Practice Location
SMS - the SMS gateway.
Appointment SMS - the default appointment reminder SMS template to use if no template is specified for a Practice Location. See also Template|Appointment Reminder SMS Template.
Reminder Configuration - determines how patient reminders are processed. See Reminder Configuration.
Smart Flow Sheet Configuration - configuration for the Smart Flow Sheet interface. See Smart Flow Sheet Configuration.
The Contacts tab is used to view and maintain the various contacts. The types are as follows:
Location - you should set this so that it can appear on reports and documents
Phone - again you should set this so that it can appear on reports and documents
Email - you need to set this, not only so that it can appear on reports and documents, but also because it is used by the system when generating the From address on emails being sent out. In particular, the code that sends out Reminders and Statements via email will the Practice's email addresses for customers who do not have a Practice Location set. If you set one with the purpose 'Billing' it will be used for the Statements. If you set one with the purpose 'Reminder' it will be used for Reminders. Note however that emails initated by users are sent out using the current location's email address(es).
See Concepts|Contacts for details.
Below is the Locations tab. You can use this to set the Practice Locations, but it's more normal to attach the locations to the practice when setting up the locations.

Below is the Taxes tab. Use this to set the applicable taxes.

Below is the Templates tab. You should set the 'default' template here for each type of template for which you have multiple templates of that type. For example if you are using different Invoice templates for some Practice Locations, then you should set the default invoice template here.

Below is the Subscription tab with no current subscription. First you need to click the link to purchase the subscription. You will be sent a key file. Upload this by clicking the Upload button.

Below is the Subscription tab showing the current subscription (with the details intentionally blurred).

Select
This is the screen used to select a Practice. It works like a standard select screen.
Practice Location
This screen is used to create/edit/view the Practice Locations, ie the branches of the practice. See Concepts|Practice and Locations for background.

The fields are as follows:
Location Name - the name of the location. This will appear on various reports and documents so it should be set as you want it to appear.
Active - uncheck this box to deactivate the location
Stock Control - check this box to enable stock control for this location
Logo - used to set the logo to be displayed at the top of the screen when the Practice Location is selected. Logos may be .png, .jpg, .gif, or .bmp format, and should be no more than 30 pixels high. Note that any new logo will be displayed after the location is selected.
Default Printer - use the pull-down to select the default printer for this location.
Pricing Group - the pricing group in use for the practice location. This is optional. It is used by practices that set different prices for the same product at different locations. See Concepts|Pricing for details.
Disable Discounts - if selected, disables discount entry when editing charges and estimates at this location.
Stock Locations - sets the Stock Location for the location. If you have Stock Control enabled for this location then you must have one. Multiple locations can share the one stock location. See also Organisation|Stock Location.
OTC - sets the OTC account for the location. You can only have one but multiple locations can share the one OTC account. See also Organisation|OTC.
Smart Flow Sheet Clinic API Key - specifies the API key used to connect to Smart Flow Sheet. See also Smart Flow Sheet integration.
Mail Server - specifies the email server to use when sending emails from the location. If none is specified, the mail server associated with the Practice will be used. See also Organisation|Mail Server.
Appointment SMS - specifies the appointment reminder SMS template to use when sending SMS reminders from the location. If none is specified, the template associated with the Practice will be used. See also Template|Appointment Reminder SMS Template.
Letterhead - specifies the Letterhead template to use for this location. This field is not mandatory but is needed if you want to use the Letterhead facility for easy customisation of invoice, credit notes, statements etc.
Online Booking - if selected, appointment schedules at this location that also have Online Booking selected, are available for online booking.
The Contacts tab is used to view and maintain the various contacts. The types are as follows:
Location - you should set this so that it can appear on reports, documents and the letterhead
Phone - again you should set this so that it can appear on reports, documents and the letterhead. If you have a fax number, you should enter it (as a Phone contact with purpose Fax) so that it can be shown on the letterhead.
Email - you need to set this, not only so that it can appear on reports, documents and the letterhead, but also because it is used by the system when generating the From address on emails being sent out. Although the code that sends out Reminders and Statements via email uses the Practice's email addresses, emails initiated by users are sent out using the current location's email address. If there are multiple email addresses set, then the user can choose the required one from a pull-down list.
Website - you should set this so that it can appear on reports, documents and the letterhead
See Concepts|Contacts for details.
Below is the Practice tab. Use this to set the Practice to which this location belongs. Note that you can have a location not attached to a practice, but it can't be used because it can't be selected using the Location pull-down at the top right of the screen.

Below is the Tills tab. Use this to set theTill(s) for the location. You must have at least one, otherwise there is nowhere to put the money. It is possible for multiple locations to share tills. See also Organisation|Tills.

Below is the Deposit Accounts tab. Use this to set the Deposit Account(s) for the location. You must have at least one, otherwise there is nowhere to deposit the money. It is possible for multiple locations to share accounts. See also Organisation|Deposit Accounts.

Below is the Schedule Views tab. Use this to set the Schedule Views for the location. You must have one, but can have more. Multiple locations can share Schedule Views. See also Organisation|Schedule Views.

Below is the Work List Views tab. Use this to set the Work List Views for the location. You must have one, but can have more. Multiple locations can share Work List Views. See also Organisation|Work List Views.

Below is the Printers tab. Use this to set the printers that may be selected at the location. If no printers are listed, all will be available for selection.
The Status column indicates if a printer is Available or Unknown. If a printer is marked as Unknown, it is no longer available for selection when printing.
Below is the Templates tab. Use this to set any location specific Document Templates.These were commonly used where it was necesssary for each location to have different logos on invoices, receipts etc. However, the Letterhead facility now provides this. The facility is of use for setting location specific printers, and for testing new versions of templates.

Below is the Service Ratios tab. Use this to apply a ratio to prices of products of a specific product type, at this practice location.

Follow-up Work Lists tab. Use this to configure the work lists that may be selected when:
- clicking the
 button in the patient summary, to add a follow-up task
 - the Follow-Up At Check Out option is selected to create follow-up tasks at check-out

Select
This is the screen used to select a Practice Location. It works like a standard select screen.
SMS Configuration: Clickatell SMTP Connection
This screen is used to configure the SMS gateway for Clickatell. See also Concepts|SMS and Reference|Setup|SMS. The screen is in two parts - the top contains the parameters, the bottom allows you to test the setup.

The fields in the top half are as follows:
Name - the name of the connection
Description - a description which serves to clarify the name
Website - Clickatell's website
Active - uncheck this box to deactivate this configuration
Country Prefix - the country code, eg 61 for Australia, 44 for the UK, etc
Area Prefix - the digit used to prefix the area code, ie 0 for Australia - see also below
User - the user name for the Clickatell account
Password - the password for the Clickatell account
API ID - the API ID provided by Clickatell
From - a valid email address
Reply To - an optional email address - responses from the gateway will be sent here
Sender ID - the SMS sender ID. If specified, it must correspond to one configured with the Clickatell account.
2 Way SMS - used to indicate that Clickatell should use Sender ID to allow mobile phone users to send SMS messages to your Clickatell account. See the Send 2 Way SMS Service for more details.
Maximum Parts - the maximum number of parts that may be sent in a single message. These are sent as multiple SMS by Clickatell, but are concatenated together so that the recipient sees a single message.
Each part is charged separately by Clickatell.
The specified number must not exceed that of the Clickatell account.
Notes:
- If your Clickatell SMS Configuration was created prior to OpenVPMS 1.7.1, you will need to recreate it to use the Sender ID field.
- If your Clickatell SMS Configuration was created prior to OpenVPMS 1.9, you will need to recreate it to use the 2 Way SMS field.
The bottom half of the screen contains:
Number - the phone number to which the test message is to be sent
Message - the text for the SMS message
SMS Button - press to send the email
Email - this panel shows the email that will be sent
Status - this shows 'OK' if all is OK else an error message indicating what is wrong
To get the Email and Status to update you must press the Enter key when the cursor is positioned in either of the Number or Message fields.
Note: The Country and Area Prefixes are used to format phone numbers so that they have the required format. That is, the customer's number will be something like 0413 123 456, but the gateway needs the full international number, ie 61413123456. However, if the customer lives in another country then their number will be something like (for Hong Kong) 852 1234 5678. You need to indicate that this is an international number by prefixing it with a +, ie +85212345678.
So the logic is:
If the number starts with a +, strip it and use that number.
Else does the customer's number start with the Area Prefix? If yes, then strip the prefix and add the Country Prefix.
SMS Configuration: Generic Email Gateway
This screen is used to configure the generic SMS gateway. See also Concepts|SMS and Reference|Setup|SMS. The screen is in two parts - the top contains the parameters, the bottom allows you to test the setup. Note that this is a generic gateway configuration screen - the screen shot below shows parameters suitable for Exetel.

The fields in the top half are as follows:
Name - the name of the connection
Description - a description which serves to clarify the name
Website - the provider's website
Active - uncheck this box to deactivate this configuration
Country Prefix - the country code, eg 61 for Australia, 44 for the UK, etc
Area Prefix - the digit used to prefix the area code, ie 0 for Australia - see also below
From & From Expression - these define the email's From address. If only From is entered, this is used. If the From Expression is provided, it is evaluated and the result used. The expression may refer to the From value as "$from".
To & To Expression -these define the email's To address. If only To is entered, this is used. If the To Expression is provided, it is evaluated and the result used. The expression may refer to the To value as "$to".
Reply To & Reply To Expression - these define the email's Reply To address. If only Reply To is entered, this is used. If the Reply To Expression is provided, it is evaluated and the result used. The expression may refer to the Reply To value as "$replyTo".
Subject & Subject Expression - these define the email's Subject. If only Subject is entered, this is used. If the Subject Expression is provided, it is evaluated and the result used. The expression may refer to the Subject value as "$subject".
Text & Text Expression - these define the email's Text. If only Text is entered, this is used. If the Text Expression is provided, it is evaluated and the result used. The expression may refer to the Text value as "$text"."
Maximum Parts - the maximum number of parts that may be sent in a single message. These are sent as multiple SMS by the gateway provider, but are concatenated together so that the recipient sees a single message.
Each part will be charged separately by the provider.
The specified number must not exceed that supported by the provider.
The bottom half of the screen contains:
Number - the phone number to which the test message is to be sent
Message - the text for the SMS message
SMS Button - press to send the email
Email - this panel shows the email that will be sent
Status - this shows 'OK' if all is OK else an error message indicating what is wrong
To get the Email and Status to update you must press the Enter key when the cursor is positioned in either of the Number or Message fields.
Note: The Country and Area Prefixes are used to format phone numbers so that they have the required format. That is, the customer's number will be something like 0413 123 456, but the gateway needs the full international number, ie 61413123456. However, if the customer lives in another country then their number will be something like (for Hong Kong) 852 1234 5678. You need to indicate that this is an international number by prefixing it with a +, ie +85212345678.
So the logic is:
If the number starts with a +, strip it and use that number.
Else does the customer's number start with the Area Prefix? If yes, then strip the prefix and add the Country Prefix.
Select
This is the screen used to select an SMS configuration. It works like a standard select screen.
SMS Configuration: SMSGlobal Email2SMS
This screen is used to configure the SMS gateway for SMSGlobal. See also Concepts|SMS and Reference|Setup|SMS. The screen is in two parts - the top contains the parameters, the bottom allows you to test the setup.

The fields in the top half are as follows:
Name - the name of the connection
Description - a description which serves to clarify the name
Website - SMSGlobal's website
Active - uncheck this box to deactivate this configuration
Country Prefix - the country code, eg 61 for Australia, 44 for the UK, etc
Area Prefix - the digit used to prefix the area code, ie 0 for Australia - see also below
From - a valid email address - this must be the same as that entered in the Email to SMS settings in the Email Settings page at https://mxt.smsglobal.com/integrations/email-to-sms
Subject - placeholder subject. This is not used by SMSGlobal, but may be set to prevent mail servers from rejecting SMS emails as spam.
Maximum Parts - the maximum number of parts that may be sent in a single message. These are sent as multiple SMS by SMSGlobal, but are concatenated together so that the recipient sees a single message.
Each part is charged separately by SMSGlobal.
The specified number must not exceed that of the Maximum Messages Split Allowed setting in the SMSGlobal Email Settings page at https://mxt.smsglobal.com/integrations/email-to-sms.
The bottom half of the screen contains:
Number - the phone number to which the test message is to be sent
Message - the text for the SMS message
SMS Button - press to send the email
Email - this panel shows the email that will be sent
Status - this shows 'OK' if all is OK else an error message indicating what is wrong
To get the Email and Status to update you must press the Enter key when the cursor is positioned in either of the Number or Message fields.
Note: The Country and Area Prefixes are used to format phone numbers so that they have the required format. That is, the customer's number will be something like 0413 123 456, but the gateway needs the full international number, ie 61413123456. However, if the customer lives in another country then their number will be something like (for Hong Kong) 852 1234 5678. You need to indicate that this is an international number by prefixing it with a +, ie +85212345678.
So the logic is:
If the number starts with a +, strip it and use that number.
Else does the customer's number start with the Area Prefix? If yes, then strip the prefix and add the Country Prefix.
Schedule
This screen is used to create/edit/view the Schedules. These together with the views (see Organisation|Schedule View) determine how the Workflow|Scheduling screen works. It also sets options to control the check-in behaviour. See also the note at the bottom about * as the default appointment type.

The fields are as follows:
Name - the name of the schedule
Description - serves to clarify the name
Slot Size - this and Slot Units defines the size of each slot in the schedule
Slot Units - can be set to minutes or hours
Allow Double Booking - check this box to allow multiple appointments to be scheduled at the same time.
Active - uncheck this box to deactivate the schedule. Note that if you do deactivate a schedule because it is no longer needed, then you should also remove this schedule from any schedule views in which it is used, otherwise the Workflow|Scheduling screen will happily display and let you use a schedule that has been deactivated.
Start & End Time - these define the work day - ie the times between which appointments can be booked. If left unset, they default to 08:00 to 18:00 respectively. Enter either in hh:mm or hhmm format. If you enter just the hour the minute portion will be set to the current time (ie 9 yields 9:13 if the current time is 11:13).
If you set say 18:00 as the end time, then the last slot shown on the schedule will start at the slot size before this, ie 17:45 if you have a 15 minute slot size.
For a practice that operates on a 24 hour basis, you should set the start time to 00:00 and the end to 24:00.
Use All Work Lists - if this box is checked, then when an appointment if checked-in from this schedule, you will be able to choose any work list, otherwise only the worklists defined in the Work Lists tab will be available
Input Weight - if this box is checked, then as part of the check-in, the New Weight screen will be displayed so that the patient's weight can be entered
Use All Templates - if this box is checked, then as part of the check-in, all patient form and letter document templates will be displayed for you to select from, otherwise only those defined in the Templates tab will be available
Send Appointment Reminders - if this box is checked, SMS reminders may be sent automatically for appointments in the schedule. If not checked, then SMS reminders can still be sent manually.
Online Booking - determines if this schedule is available for online booking
Online Booking Times - specifies alternative times to the Start and End Times for online bookings.
Location - this field is mandatory and is used to set the Practice Location to be associated with this schedule when sending out SMS appointment reminders.
Cage Type - identifies a schedule as being a physical cage, used for boarding or in-hospital stay.
Views tab - used to set the Schedule Views which this Schedule is included in
Appointments Types tab - as shown below, this is used to view, add and delete the Appointment Types that are valid for this Schedule.
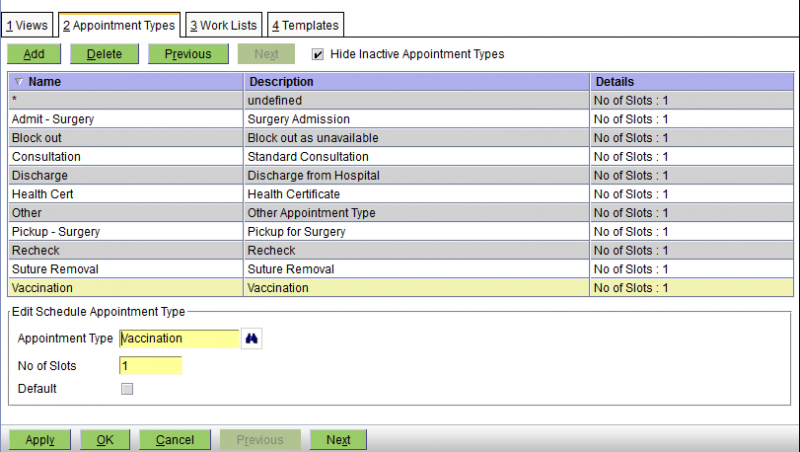
The fields are as follows:
Appointment Type - the appointment type (the available types are determined by the Administration|Types|Appointment screen)
No of Slots - the lenght of this appointment type in this schedule
Default - check this box if this is the default appointment type.
Work Lists tab - as shown below, this is used to view, add and delete the Work Lists you can choose from when checking-in an appointment on this schedule.

As you can see you can add, delete and modify the set of work lists, and also change the order in which they are listed (so that the most common one can be put at the top).
Templates tab - as shown below, this is used to view, add and delete the patient form and letter document templates that will be presented to choose from when checking-in an appointment to this schedule.
The templates will only be used if Use All Templates is not selected.

As you can see you can add, delete and modify the list of templates.
The Print option allows a template to be pre-selected for printing. Use this if a template is always printed when a patient is checked in to the schedule.
Note that in order to enable the quickest possible selection of the Appointment Type on the Workflow/Scheduling screen, you should define an appointment type "*" (description 'unspecified') and make this the default. With this as the default, then when you create an Appointment when you press the binoculars for the Appointment Type field, you will see the complete list of available Appointment Types. Alternatively, when you tab to the Appointment Type field, (which selects the *), you can then type something to search for the required appointment type.
Select
This is the screen used to select a Schedule. It works like a standard select screen.
Schedule View
This screen is used to create/edit/view the Schedule Views. These together with the schedules themselves (see Organisation|Schedules) determine how the Workflow|Scheduling screen works.

The fields are as follows:
Name - the name of the schedule view
Description - serves to clarify the name
Active - uncheck this box to deactivate the schedule view
Display Expression - this the expression used to construct what is displayed when the schedule view contains multiple schedules. (It's not used if there is only a single schedule in the view.) See also Expressions below.
Display Notes - uncheck this if you do not want the notes icon shown on the multi-schedule version of the Workflow|Scheduling screen. On the single-schedule version, the notes text is shown in the Notes column.
Highlight - you can select None, Clinician, Event Type (ie appointment type), or Status. This determines the initial setting of the Highlight setting on the Scheduling screen. Remember that if you are going to make proper use of this highlighting facility, then you need to set different colours for each clinician (in Administration|Users), appointment type (in Administration|Types|Appointment). However if you want to change the status colours, it's more difficult - see Reference|Colours.
Multiple Day View - if selected, multiple days worth of appointments can be shown at once.
Use strikethrough for Completed/Cancelled - if selected, Completed and Cancelled appointments are displayed with strikethrough text.
Schedules tab - used to set the Schedules which this Schedule View includes. If there are more than one, then the Workflow|Scheduling screen initially shows each schedule in its own column. If there is only one, then a different screen format is used with columns for each of Status, Appointment Type, Customer, Patient, Reason and Notes. Even with a multiple-schedule view, you can switch the Scheduling screen to show only a single schedule.
Test Button
Pressing the Test button opens a window that allows you to test and compose expressions. It includes documentation and examples as well as its own Test button that actually tests your expression and displays the resulting text.
Expressions
The expression shown in the screenshot above is duplicated here so you can copy it:
concat(openvpms:get(.,'clinician.name'),': ',openvpms:get(.,'customer.name'),' - ',openvpms:get(.,'patient.name'),'\n',openvpms:get(.,'act.reasonName'),' - ',openvpms:get(.,'act.statusName'))Note that what we are doing is concatenating together bits of information from the openvpms:get calls with various separators, eg ': '. The '\n' injects a newline character to start a second line.
The following table shows the parameters that the expressions have access to, that is, each of the node names which can be used in the openvpms:get(.,'nodeName') function.
| Node Name | Explanation |
|---|---|
| act.description | Appointment Notes |
| act.status | Status code (eg PENDING) |
| act.statusName | Status (eg Pending) |
| act.reason | Reason code (eg HIT_BY_CAR) |
| act.reasonName | Reason (eg Hit by Car) |
| customer.name | Name of Customer (eg Smith,Fred) |
| patient.name | Name of Patient |
| clinician.name | Name of Clinician |
| schedule.name | Name of the schedule |
| scheduleType.name | Appointment Type |
| arrivalTime | Time arrived, ie check-in time (eg Sat Jul 27 10:15:47 EST 2013) empty string if not checked-in yet use date:format functions to format, eg date:formatDateTime(openvpms:get(.,'arrivalTime'),'short') yields 27/7/13 10:16 AM |
| waiting | Time as '(h:mm)' since check-in, empty string if not checked-in yet |
There are also a number of others which may be used, but not particularly efficiently as they require database queries.
- patient.objectReference - reference to the patient
- act.objectReference - reference to the appointment/task
- schedule.objectReference - reference to the schedule
- customer.objectReference - reference to the customer
- clinician.objectReference - reference to the clinician
To get the breed, do:
openvpms:lookup(openvpms:get(., "patient.objectReference"), "breed")
To get the customer's last name, do:
openvpms:get(.,"customer.objectReference.lastName")
Notes:
- the various objectReference properties above aren't supported by the Display Expression editor and hence if you use its Test function, you will get 'Expression Error'
- if there is no patient, an empty string will be returned
However, if you need a customer's full name and address to show on a schedule view so that a house call vet can look at the schedule with his iPhone to see where to go next, then the following will do the trick:
normalize-space(openvpms:get(., "customer.objectReference.description"))
The 'normalize-space' function (one of the xpath functions) removes the newline characters to convert the multiline address into a single line.
Finally, an example where the information is displayed over three lines but is limited to 30 characters wide:
concat(substring(concat(openvpms:get(., 'clinician.name'),': ', openvpms:get(., 'patient.name'),' ',openvpms:get(.,'customer.objectReference.lastName')),1,30),'\n', substring(concat('[',openvpms:lookup(openvpms:get(., 'patient.objectReference'),'breed'),']'),1,30),'\n', substring(concat(openvpms:get(.,'scheduleType.name'), ':', openvpms:get(.,'act.reasonName'),' ', openvpms:get(.,'waiting')),1,30)) Select
This is the screen used to select a Discount Type. It works like a standard select screen.
Stock Location
This screen is used to create/edit/view the Stock Locations, ie the store rooms where stock is held. See Concepts|Stock Control for background.

The fields are as follows:
Name - the name of the stock location. This will appear on various reports and documents so it should be set as you want it to appear.
Description - used to clarify the name if necessary
Active - uncheck this box to deactivate the stock location
The Default Author tab is used to view and maintain the user set as the author of stock management transactions generated by the system. It is possible to set an normal user for this, but it is better to create a special user - as is shown in the screen shot above.
Below is the Locations tab. Use this to set the Practice Locations to which this stock location belongs. One stock location can be used by multiple practice locations, but a practice location cannot have more than one stock location. Note that you can have a stock location not attached to a practice location, but it is of little use since all you can do is use the Products|Stock Management|Stock Transfer transaction to transfer items to it. However, you could use this as a mechanism to keep a record of written-off stock, ie create a stock location called Write-offs unlinked to any practice location, and transfer written-off stock to it.

Select
This is the screen used to select a Stock Location. It works like a standard select screen.
Till
This screen is used to create/edit/view the details of the Tills. See Concepts|Tills for background information.

The fields are as follows:
Name - the name of the till
Till Float - the float - ie the amount of cash money to be left in the till when it is cleared as part of the Reporting|Till Balancing|Clear operation
Last Cleared - the date on which the till was last cleared. Although you can modify this field, you should not normally need to as it is set by the system.
Active - uncheck this box to deactivate the till
Printer Name - the receipt printer name. Used in conjunction with Drawer Command to open the cash drawer.
Drawer Command - a comma separated list of numbers, in the range 0..255 that may be used to trigger the cash drawer to open. The Test button can be used to verify that the Drawer Command can be used to open the drawer.
Locations tab - used to set the Practice Locations which this till is used by
Opening the Cash Drawer
Many POS terminals support opening the cash drawer by sending a set of control codes to the receipt printer. OpenVPMS supports this through the Printer Name and Drawer Command fields.
OpenVPMS will send the drawer command to the receipt printer when:
- a payment containing Cash, Cheque, or Credit line item is finalised
- a payment containing an EFT line item with non-zero Cashout is finalised
- a refund containing a Cash, Cheque or Credit line item is finalised
Consult your POS terminal vendor for the appropriate control codes to use.
Alternatively, see this list.
Work List
This screen is used to create/edit/view the Work Lists. These together with the views (see Organisation|Worklist View) determine how the Workflow|Scheduling screen works and also to control what screens are presented as part of the check-in and worklist transfer processes. See also the note at the bottom about * as the default task type.

The fields are as follows:
Name - the name of the work list
Description - serves to clarify the name
Max Slots - the maximum number of slots in the work list, ie how many entries it can contain. For normal 'list of jobs' work lists this can be left at the default of 100. However, if your work list represents some limited commodity such as the number of boarding kennels, then you should set the Max Slots to this.
Active - uncheck this box to deactivate the work list. Note that if you do deactivate a work list because it is no longer needed, then you should also remove this work list from any work list views in which it is used, otherwise the Workflow|Work Lists screen will happily display and let you use a work list that has been deactivated.
Use All Templates - uncheck this box if you want to limit the list of document templates presented for selection at check-in and worklist transfer time. You will then need to use the Templates tab to define which templates are to be displayed for selection, and if none are defined then the document selection step will be skipped. If the box is checked, then all suitable templates will be displayed for selection. Note that even if you do want to be able to select from all available templates, you may want to uncheck this box and list all the templates in the Templates tab because you can then control the order so that the most commonly used one are listed first.
Input Weight - uncheck this box if you do not want the Weight recording window to be displayed as part of the Check In process.
Create Flow Sheet - used to create a Smart Flow Sheet for a patient on Check In, or when the patient is transferred to the Work List. Only applies if Smart Flow Sheet has been configured for the Practice Location. If set to Default, the Default Flow Sheet Department and Default Flow Sheet Template will be used. If set to Prompt, the Flow Sheet department, template and expected days stay will be prompted for.
Default Flow Sheet Department - the default Flow Sheet department. Only applies if if Smart Flow Sheet has been configured for the Practice Location.
Default Flow Sheet Template - the default Flow Sheet treatment template. Only applies if if Smart Flow Sheet has been configured for the Practice Location.
Expected Hospital Stay - the default expected number of days stay.
Views tab - used to set the Work List Views which this Work List is included in
Task Types tab - as shown below, this is used to view, add and delete the Task Types that are valid for this work list.

The fields are as follows:
Task Type - the task type
No of Slots - this field is not currently used by the system (every task type uses one slot in the work list irrespective of anything you set here)
Default - check this box if this is the default task type
Templates tab - as shown below, this is used to view, add and delete the Templates that are valid for this work list - i.e. those that will be suggested for use when a check-in or task transfer is done.
The templates will only be used if Use All Templates is not selected.

As you can see you can add, delete and modify the list of templates.
The Print option allows a template to be pre-selected for printing. Use this if a template is always printed when a patient is checked in or transferred to the Work List.
Note that in order to enable the quickest possible selection of the Task Type on the Workflow/Work Lists screen, you should define an task type "*" (description 'unspecified') and make this the default. When you do the check-in, this will get set as the task type, and can generally be left as is BECAUSE the Notes field of the worklist entry gets automatically set to the Appointment Reason + the Appointment Notes. However, if you do want to set a specific Task Type, you can just edit the Worklist entry and press the Task Type binoculars to show the available types (and all available types will be displayed because * acts as a wildcard mean 'show all').
If you don't like this approach, then be sure to set the default task type for the worklist to the most common task, so that most of the time you don't need to change it.
Select
This is the screen used to select a Work List.

It works like a standard select screen.
This screen is displayed when performing a Check-In, or transferring a task from one work list to another.
Check-In
Click on the required work list to choose it. The patient weight screen will then open as the next part of the check in process.
Pressing Skip will skip the selection of the work list so this activity will not be listed on any work list. This is not normally a sensible thing to do. However, if you do have a current consult running, then you can get to the visit edit screen for that consult by pressing the Check-In button and skipping everything (Alt-K is the easiest) until you get to the visit editor.
Pressing Cancel will abort the check-in.
Transfer
Click on the work list to transfer to. If the work list is not available at the current practice location, select All Locations to list all matching work lists.
If the work list has document templates, a print dialog will be displayed.
Work List View
This screen is used to create/edit/view the Work List Views. These together with the work lists themselves (see Organisation|Work Lists) determine how the Workflow|Work Lists screen works.

The fields are as follows:
Work List View - the name of the work list view
Description - serves to clarify the name
Active - uncheck this box to deactivate the schedule view
Display Expression - this the expression used to construct what is displayed when the work list view contains multiple work lists. (It's not used if there is only a single work list in the view.) See also Expressions below.
Display Notes - uncheck this if you do not want the notes icon shown on the multi-work list version of the Workflow|Work List screen. On the single-work list version, the notes text is shown in the Notes column.
Highlight - you can select None, Clinician, Event Type (ie task type), or Status. This determines the initial setting of the Highlight setting on the Work Lists screen. Remember that if you are going to make proper use of this highlighting facility, then you need to set different colours for each clinician (in Administration|Users), task type (in Administration|Types|Task Type). However if you want to change the status colours, it's more difficult - see Reference|Colours.
Work Lists tab - used to set the Work Lists which this Work List View includes. If there are more than one, then the Workflow|Work Lists screen shows each work list in its own column. If there is only one, then a different screen format is used with columns for each of Status, Appointment Type, Customer, Patient, Reason and Notes. Even with a multiple-work list view, you can switch the Work List screen to show only a single work list.
Test Button
Pressing the Test button opens a window that allows you to test and compose expressions. It includes documentation and examples as well as its own Test button that actually tests your expression and displays the resulting text. Note that it is possible to write a valid complex expression that the Test facility says is invalid - see the note at the bottom of this page.
Expressions
The expression shown in the screenshot above is duplicated here so you can copy it:
concat(openvpms:get(.,'clinician.name'),':',openvpms:get(.,'patient.name'),' ',openvpms:get(.,'customer.objectReference.lastName'),' =',substring(openvpms:get(.,'act.status'),1,2),' ', openvpms:get(.,'waiting'),'{',date:format(openvpms:get(., 'act.objectReference.appointments.source.startTime'), "HH:mm"),'}',openvpms:get(.,'customer.objectReference.type.name'),'\n','[',openvpms:lookup(openvpms:get(.,'patient.objectReference'),'breed'),'] ',openvpms:get(.,'scheduleType.name'),':',openvpms:get(.,'act.objectReference.author.entity.name'),'\n',openvpms:get(.,'act.description')) Note that what we are doing is concatenating together bits of information from the openvpms:get calls with various separators, eg ': '. The '\n' injects a newline character to start a second line. The above expression generates output like:

ie the clinician is DQ, the patient is Miso, customer last name Liang, status is In Progress, 1 hour 32 between being checked in and the consult starting, the appointment was at 09:15, the customer Account Type is 'Creature Comforts', breed is Poodle-Toy, task type is Hospital Inpatient, the task author is 'Anita Chiu', and the bottom line gives the task notes.
The following table shows the parameters that the expressions have access to, that is, each of the node names which can be used in the openvpms:get(.,'nodeName') function.
| act.description | Task Notes |
| act.status | Status code (eg PENDING) |
| act.statusName | Status (eg Pending) |
| act.reason | [can be used but always empty] |
| act.reasonName | [can be used but always empty] |
| customer.name | Name of Customer (eg Smith,Fred) |
| patient.name | Name of Patient |
| clinician.name | Name of Clinician |
| schedule.name | Name of the work list |
| scheduleType.name | Task Type |
| waiting | Time between check-in and consult starting in format (hh:mm). Empty if this not available. |
There are also a number of others which may be used, but not particularly efficiently as they require database queries.
- patient.objectReference - reference to the patient
- act.objectReference - reference to the appointment/task
- schedule.objectReference - reference to the schedule
- customer.objectReference - reference to the customer
- clinician.objectReference - reference to the clinician
- author.objectReference - reference to the author
To get the breed, do:
openvpms:lookup(openvpms:get(., "patient.objectReference"), "breed")
To get the customer's last name, do:
openvpms:get(.,"customer.objectReference.lastName")
To get the referring practice if any, use:
expr:concatIf('\n', 'Ref: ',openvpms:get(party:getPatientReferralVetPractice(openvpms:get(., 'patient.objectReference')), 'name'))
In the above, the expr:concatIf() function ensures that things work nicely if there is no referring practice since the whole expression becomes null if one component is null.
To get the appointment start time (in 24hour format) for this task, do:
date:format(openvpms:get(., 'act.objectReference.appointments.source.startTime'), "HH:mm"))
Notes:
- the various objectReference properties above aren't supported by the Display Expression editor and hence if you use its Test function, you will get 'Expression Error'
- when you are testing a new expression, remember that you need to logout and log back in again in order for the new expression to be active
- if there is no patient, and empty string will be returned
- The various $patient, $customer, $task etc variables that are available in macro expressions are not available here
However, if you need a customer's full name and address to show on a schedule view so that a house call vet can look at the schedule with his iPhone to see where to go next, then the following will do the trick:
normalize-space(openvpms:get(., "customer.objectReference.description"))
The 'normalize-space' function (one of the xpath functions) removes the newline characters to convert the multiline address into a single line.
Select
This is the screen used to select a Work List View. It works like a standard select screen.
Confirm Delete
When you press the Delete button on the Administration|Organisation screen, a confirmation window will appear.
If the selected Organisation is not in use and can be deleted, the window will simply ask you to confirm the delete. Press OK to confirm or Cancel to abort.
If it cannot be deleted because it is in use, the text will be "xxxx has relationships and cannot be deleted. Do you want to deactivate it instead?"(where xxx is the name of the item you are trying to delete). Pressing OK will unset its Active flag, Cancel will abort.
If it is in use but can be deleted, the text will be "xxxx has relationships. Are you sure want to delete? This operation cannot be undone." (where xxx is the name of the item you are trying to delete). Pressing OK will delete the item as well as all references to it, Cancel will abort.
Confirm New
This is the New Organisation confirmation window. Select the type of Organisation to be created and then use OK to continue or Cancel to abort. Note that if you have selected a type on the Organisation screen, then this will already be selected in this window (even if it is not showing in the list of types) - thus you can normally simply click OK to proceed.