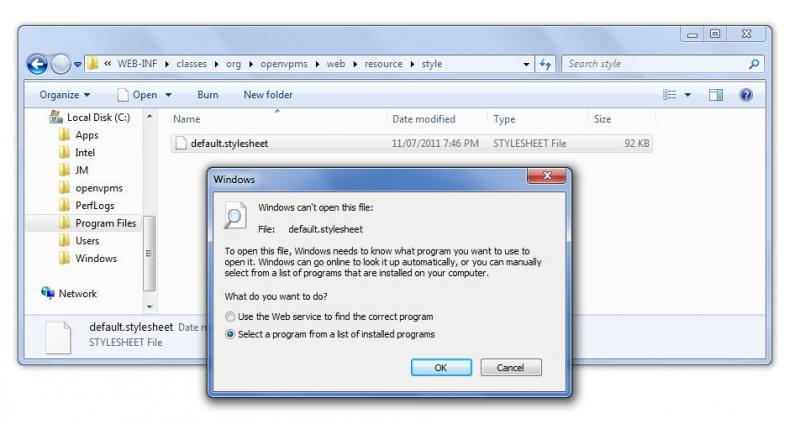
Tweaks and customisation
Adding gzip compression to tomcat to improve speed.
Gzipping can result in a significant speed improvement in downloading of files from the tomcat server and is easily enabled in tomcat. When the client (browser) makes a http request it tells the server if it has the ability to deflate. If so the server can gzip files such as xml, css and javascript before they are sent to the client. Significant speed increases are seen in the OpenVPMS web application especially when served from a remote server.
To enable this feature edit the connector in tomcat's server.xml file and add the compression settings as below:
Connector port="8080" maxHttpHeaderSize="8192"

               maxThreads="150" minSpareThreads="25" maxSpareThreads="75"

               enableLookups="false" redirectPort="xxxx" acceptCount="100"

               connectionTimeout="20000" disableUploadTimeout="true" useBodyEncodingForURI="true"

               compressableMimeType="text/html,text/xml,text/css,text/javascript,text/plain" compression="on"

               compressionMinSize="2048" noCompressionUserAgents="gozilla, traviata" />
If you are using firefox you can use the Yslow plugin to check if gzipping is enabled or not. Yslow can also be used to tell you the speed prior to and following enabling compression.
Auto-capitalisation
Since version 1.4, I have been getting frustrated with this function taking capitals out of acronym like FIV (changing it to Fiv) when editing product names or adding few products or fees. Can it be turned off in some areas (it doesn't exist when writing client histories for example).
Glen
Greenvale
Configuring Your New Installation
Setting Up openVPMS: Configuration: Your First Steps.
CONTENTS
1. Adding Towns and States (all of Australia)
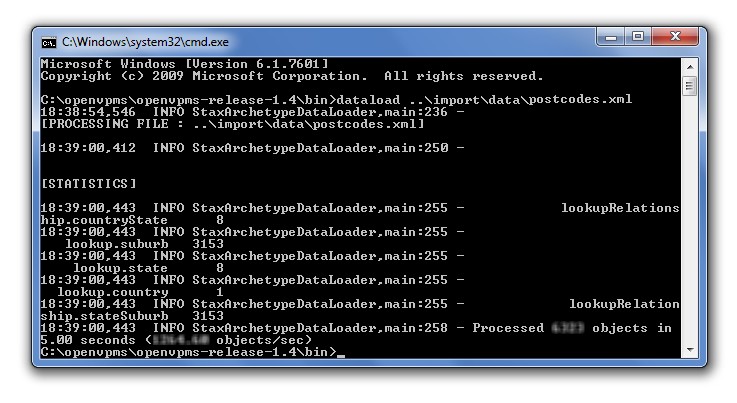
dataload.bat ../import/data/postcodesAU.xml
You will see a series of processing messages.......
.... and be returned to the Command Prompt when the dataload has completed.
Make sure you haven't added any states or suburbs first as this may cause duplicate errors and the load would fail.
Close the Command Prompt window when you're done.


2. Adding Your Clinic Details
Click Edit, delete "openvpms practice" and type in your clinic's name (6), click Contacts (7) | Add (8) and enter your clinic's address (9). Press Apply (10).
Click on Phone Number (11), enter your clinic area code and number (12), and click Apply (13).
Click on Taxes (14), select Gst in left column and click on arrow to move into "Selected" column (15). Click Ok (16) to save changes and complete this section.
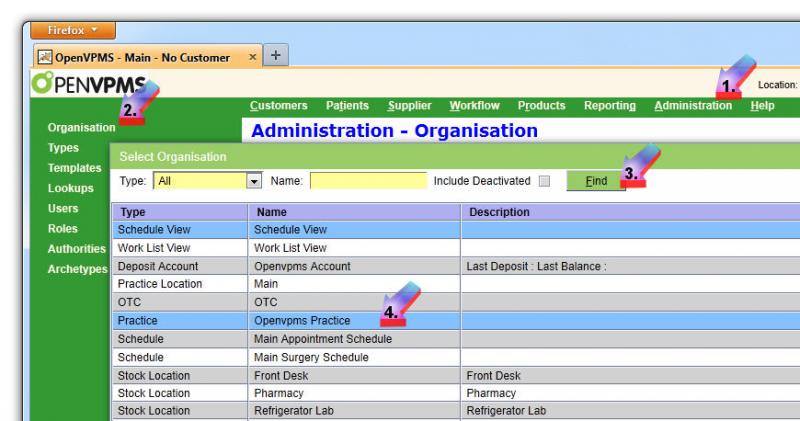
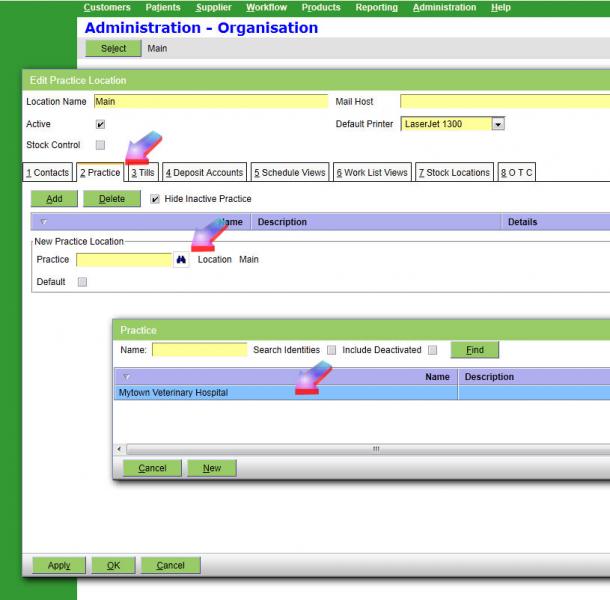
Click Administration | Organisation | Main.
In the same manner as decribed above, set up location and phone number.
Click on Practice | Add | Click on Binoculars | double-click on your hospital name.
Select your default printer from a drop-down box (this should be a printer installed to the server on which openVPMS resides either as a local or network printer).
If you're going to send email from openVPMS, you'll need to place the address of your ISP's smtp mail server here (as shown above). Look in the configuration of your email client (Outlook, Thunderbird, etc) for "outgoing mail server" for the server address. You'll need to add these to this screen: place your ISP's smtp server at Mail Host and your email address and passwords in the appropriate fields, as below:
Click Ok to save changes and complete this section.
3. Setting Up Scheduling
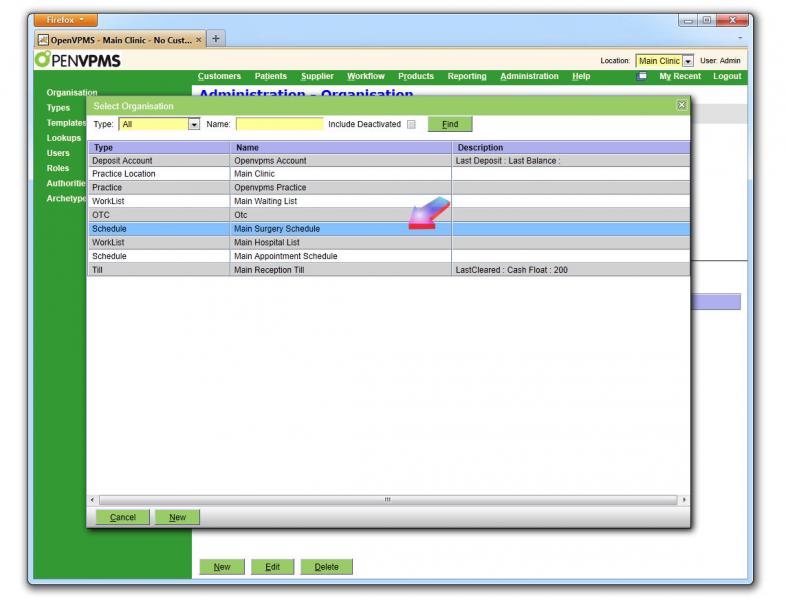
Click on Administration (1) | Organisation (2) | Select (3) | All (4) | Find (5).
Double-click on Main Appointment Schedule (6).
Click on Edit.
Fill in start and end times in 24 hour format (eg 0900), select slot size, and click OK.
Once again, click on Administration | Organisation | Select | All | Find .
Double-click on Main Surgery Schedule.
Fill in start and end times in 24 hour format (eg 0900), select slot size, and click OK.
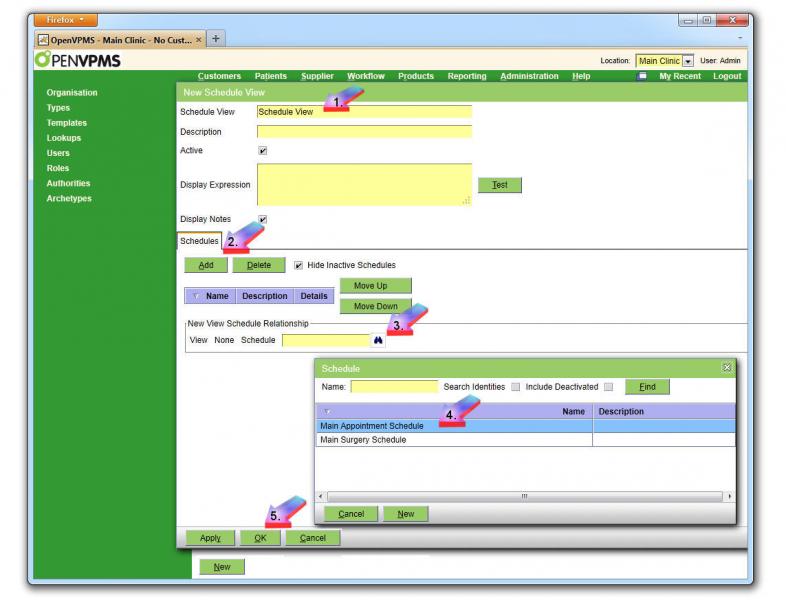
Create a new Schedule View called Schedule View.
Click on Administration | Organisation | Select | Schedule View | Find .
You'll see No results to display.
Click on New.
A new window pops up.
Type in Schedule View (1).
Click Add (2) | Binoculars {Search}.
Double-click on Main Appointment Schedule (4).
Window will close. Press OK (5).
Click Edit (1) | Add (2) | Binoculars {Search} (3).
Double-click on Main Surgery Schedule (4).
Window will close. Press OK (5).
Click on Administration | Organisation | Select | All | Find .
Double-click on Practice Location (Main Clinic).
Click Edit. A new window pops up.
Click Edit (1) | Add (2) | Binoculars {Search} (3).
Double-click on Schedule View (4).
Window will close. Press OK (5).
Log out, then log in again.
Click on Workflow | Scheduling and you should be able to add, modify and remove appointments.
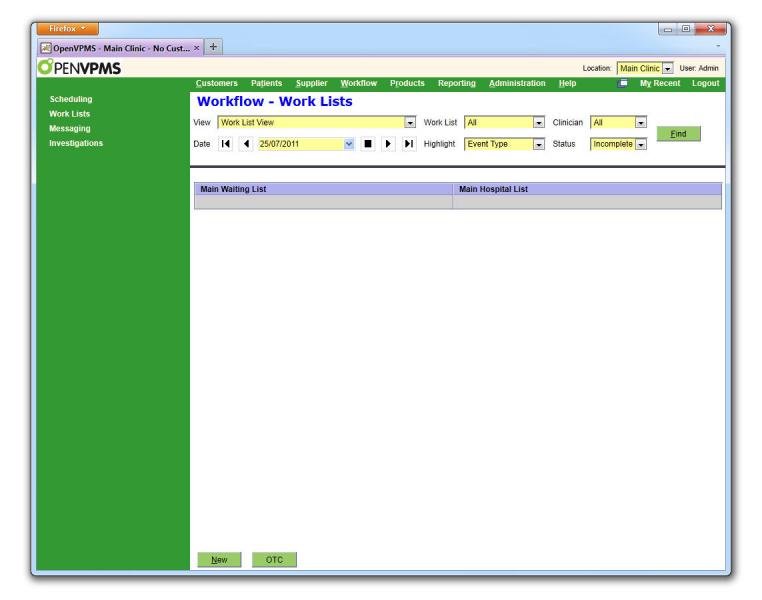
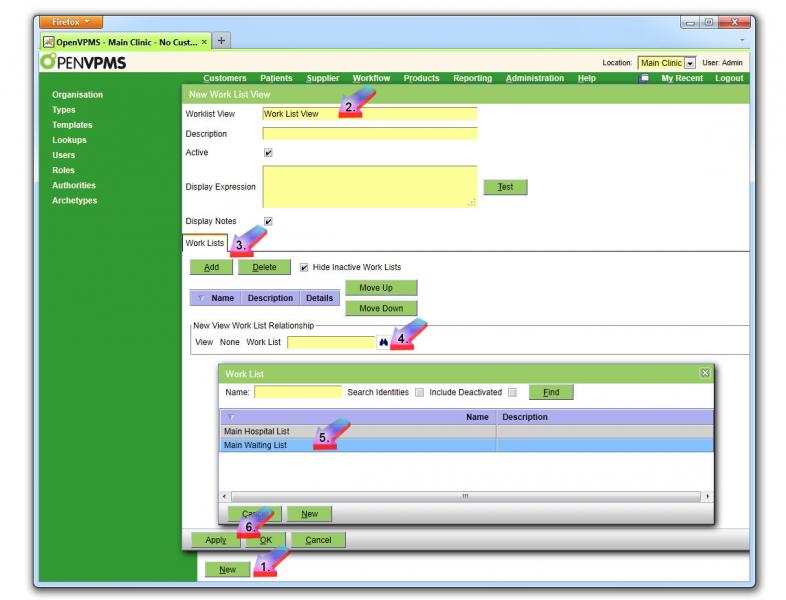
4. Setting Up Work List
Your resultant screen should look like this:
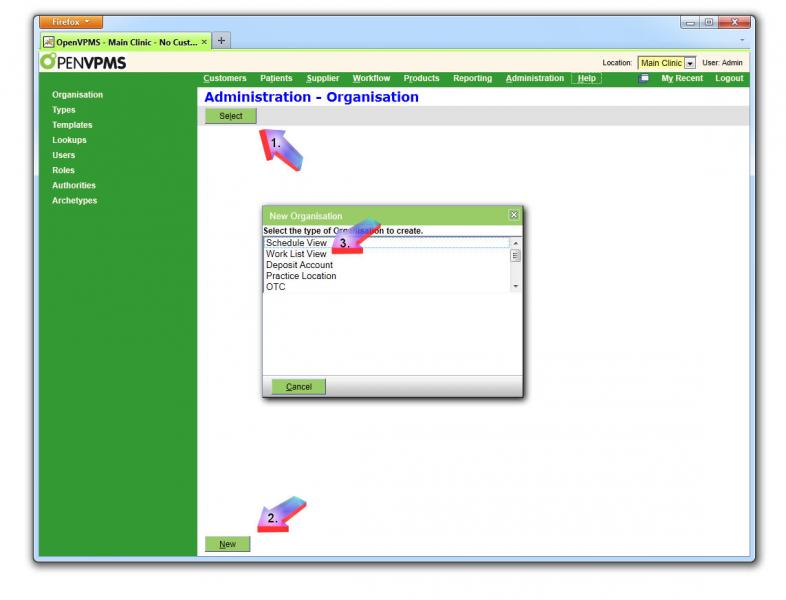
Click on Administration | Organisation | Select | All | Find .
Double-click on Practice Location (Main Clinic).
Click Edit. A new window pops up.
Click Work List Views (2) | Add (3) | Binoculars {Search} (4).
Double-click on Work List View (5).
Window will close. Press OK (6).
Log out, then log in again.
Click on Workflow | Work Lists and you should be able to add, modify and remove clients on and off lists.
Compiled 10 August 2011 by Yuri Sos from many forum posts


Creating a Demo/Training Version of openVPMS on a Windows 7 Computer
CONTENTS
- Turn Off UAC
- Create Demo Database
- Prepare openvpms-demo
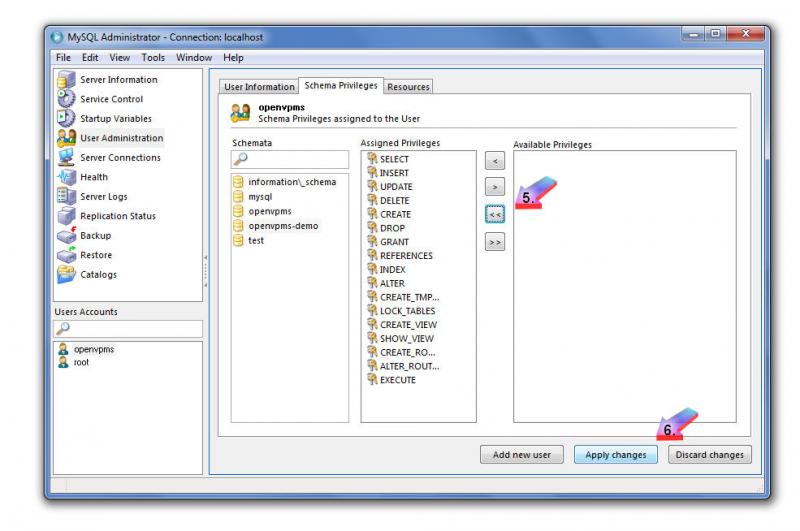
- Set Schema Privileges in MySQL Administrator
- Change Background Colour To Orange
- Restart PC And Test
Introduction
This tutorial describes step-by-step preparation of an alternate demo version of openVPMS for training purposes, allowing you to run the system without compromising your main installation.
You should be logged into the PC where openVPMS resides using an account with Administrator privileges.
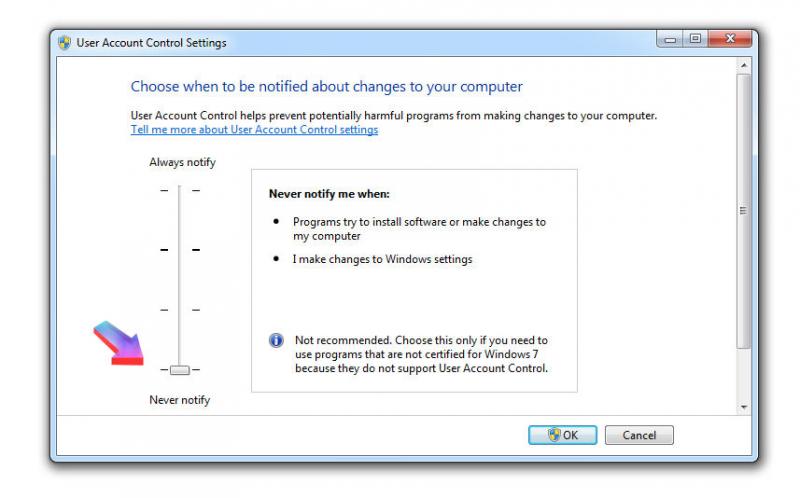
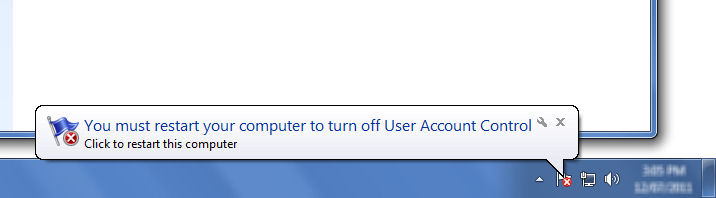
1. Turn Off User Account Control (UAC)
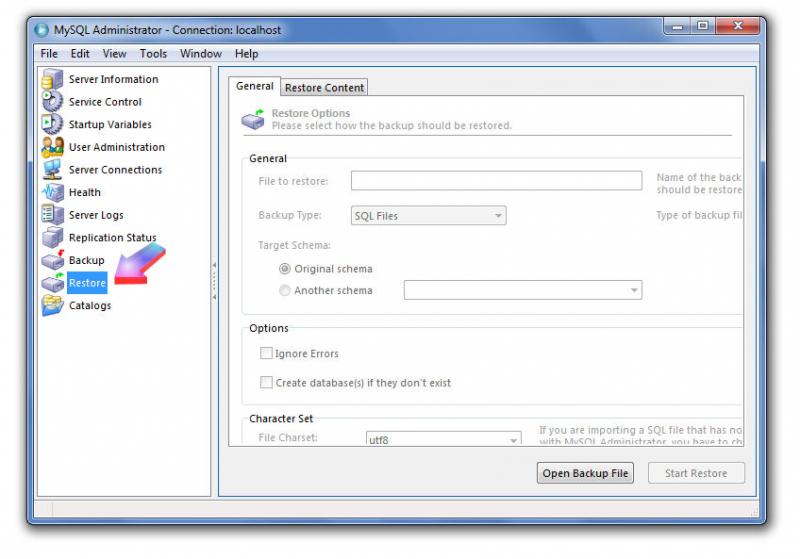
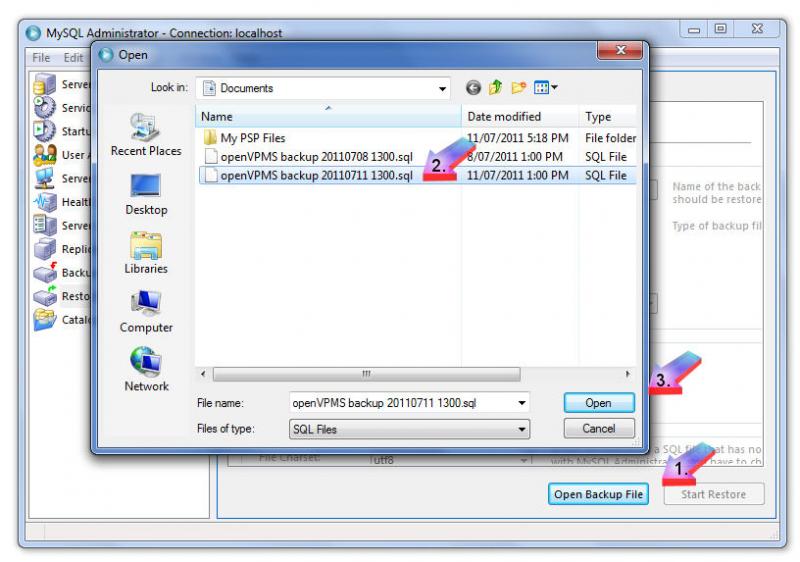
2. Create Demo Database
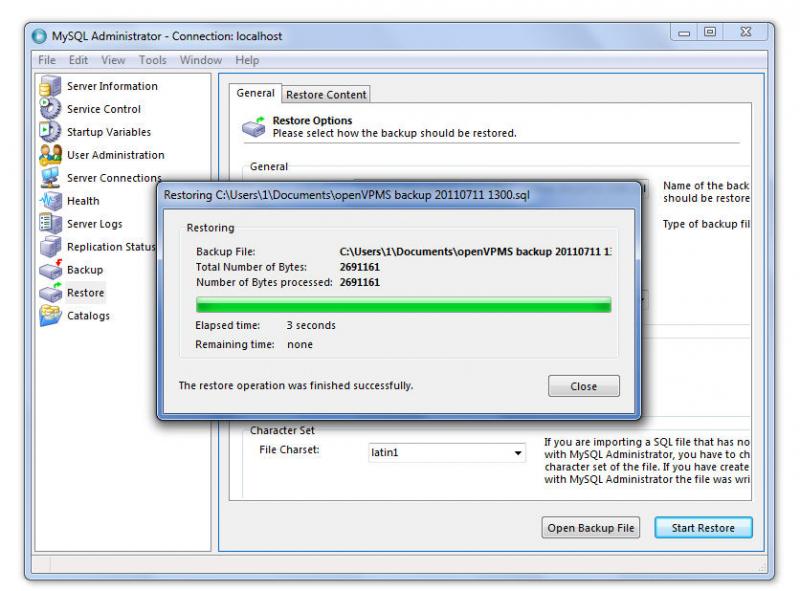
Click Open Backup File (1), select your file (2), and click Open (3):
Once the operation is complete, click Close and exit MySQL Administrator.
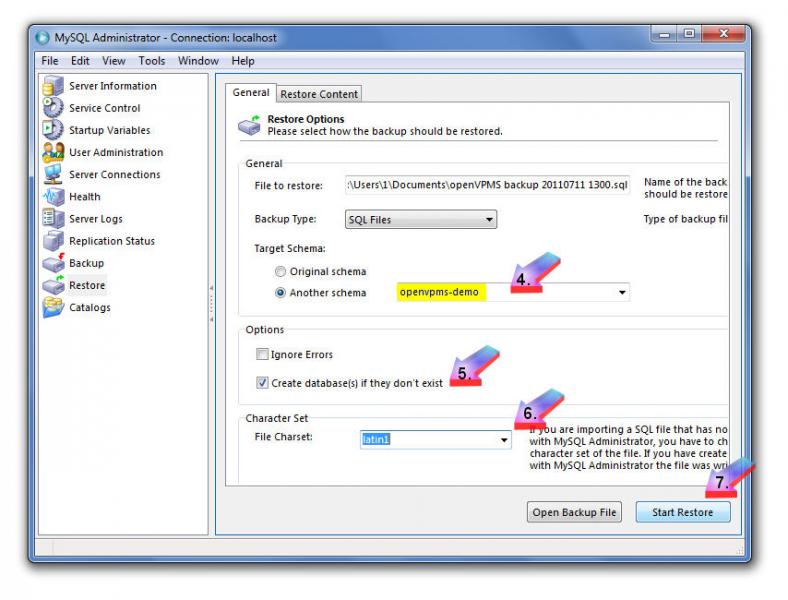
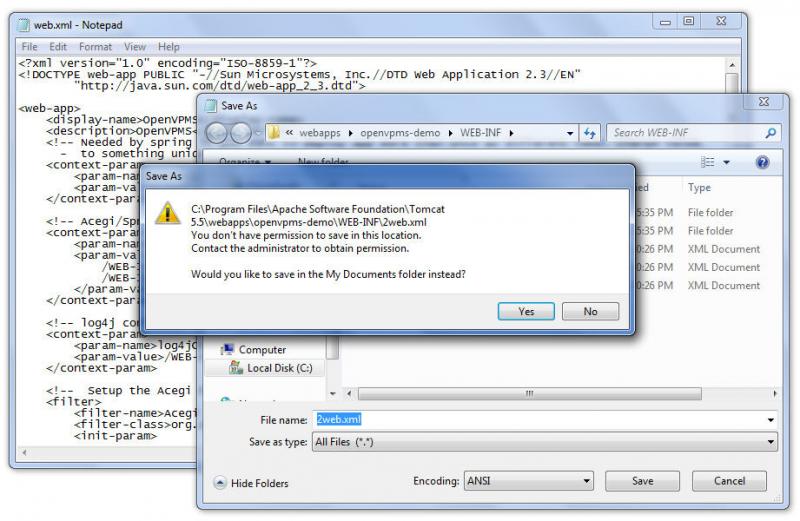
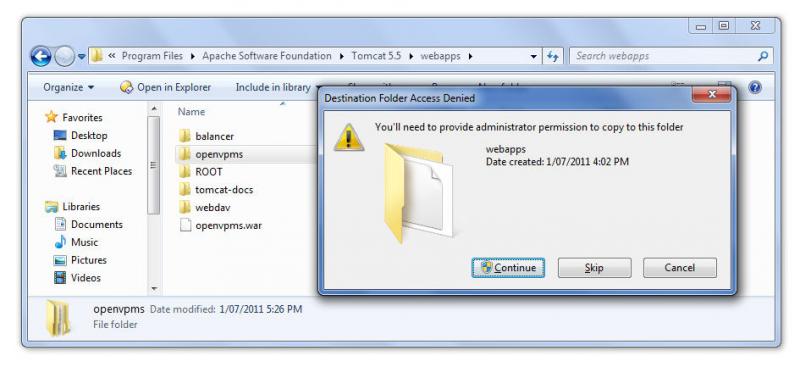
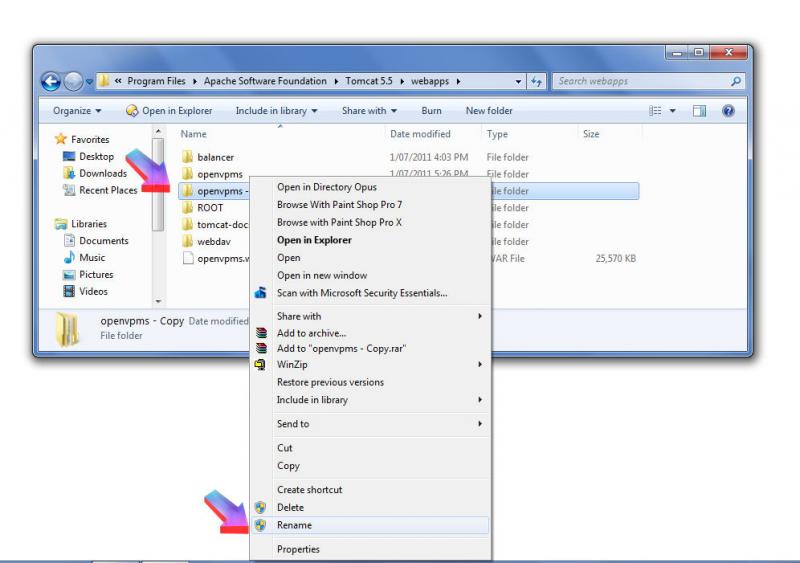
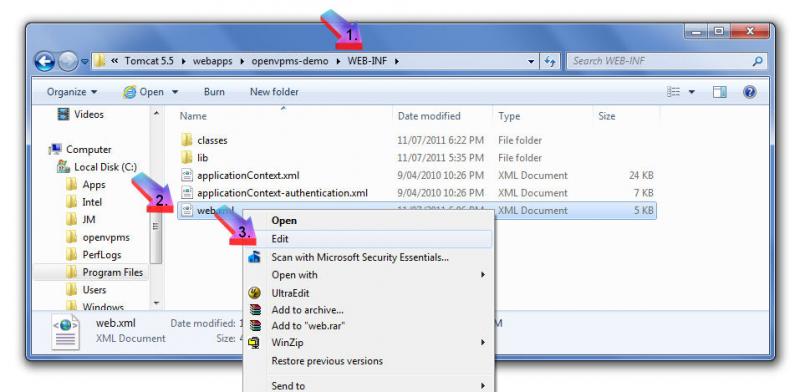
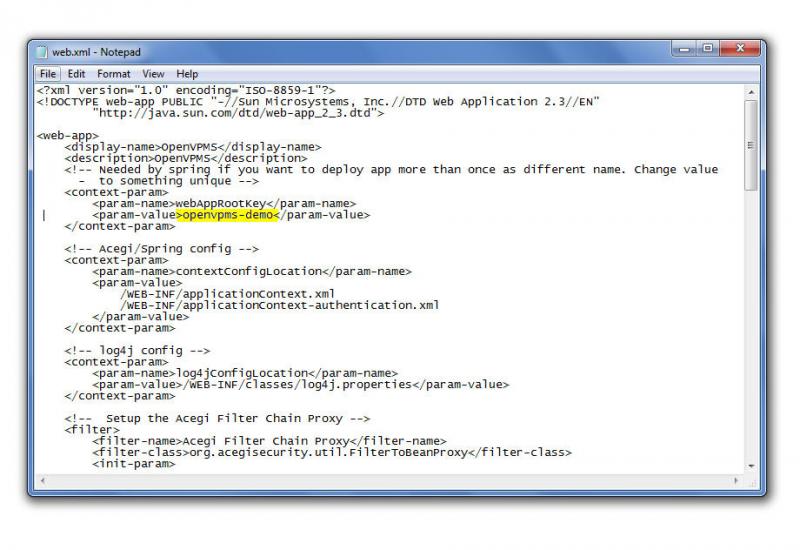
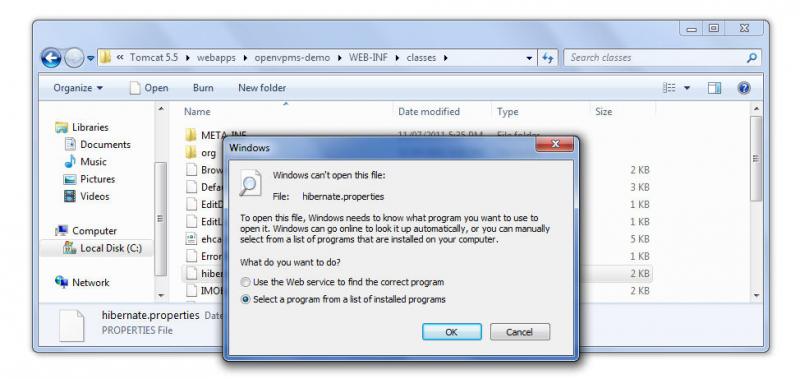
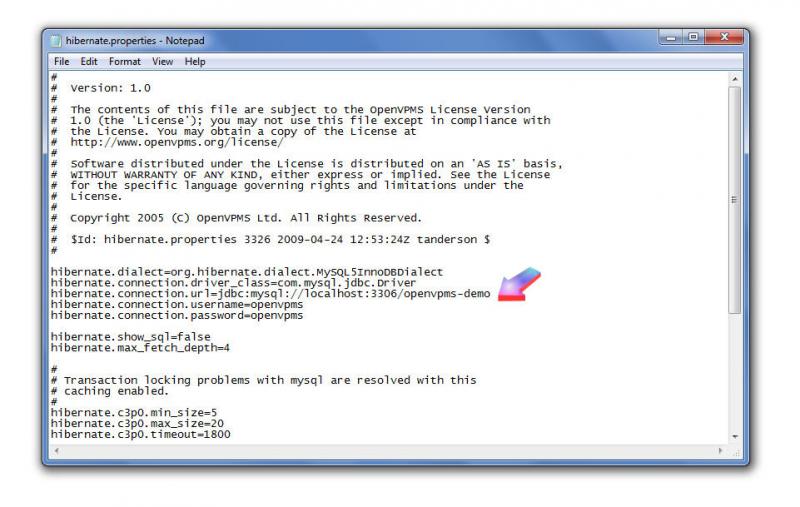
3. Prepare openvpms-demo
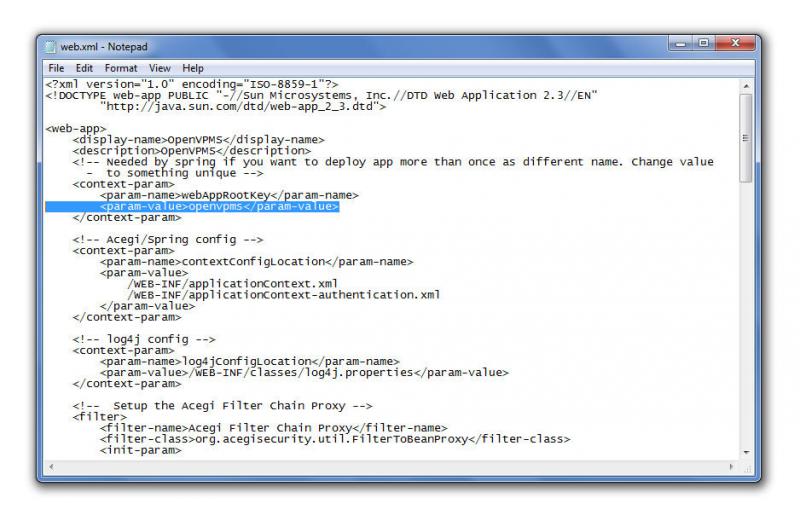
Change the openvpms in the highlighted line to read openvpms-demo, thus:<param-value>openvpms-demo</param-value>
hibernate.connection.url=jdbc:mysql://localhost:3306/openvpms-demo
Save and close the file.4. Set Schema Privileges in MySQL Administrator
5. Change Background Colour To Orange
6. Restart and Test
Open Firefox and type in http://localhost:8080/openvpms-demo/app. Log in as admin/admin and you should have openVPMS in orange ready for you to use for training.
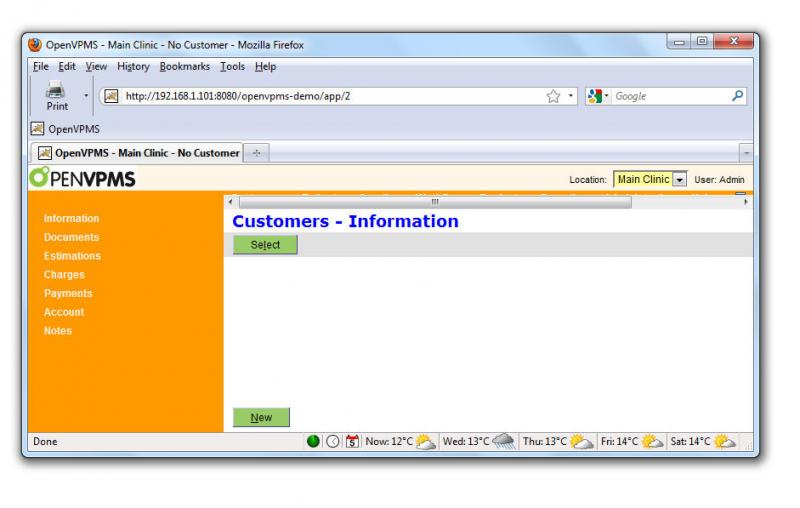
To start OpenVPMS-demo on another PC on the network, you will need to type in http://IPv4_address:8080/openvpms-demo; in example below, http://192.168.1.101:8080/openvpms-demo:
Hope this helps.
Created 20 July 2011 (Author: Yuri Sos)


Reminder Setup
Hi,
We are just setting up a new range of reminders and it's been ages since I've worked in this area so I'm a bit rusty. A couple of questions
Cancel Interval: If this is set a for example 2 years. What happens after two years?
Senstivity Interval: Is this to do with the reminder bells appearing? Can someone give me a refresher here?
Sandra.
Setting Up A Scheduled Task in Windows 7
Setting Up A Scheduled Task in Windows 7
This tutorial is essentially an appendix to the tutorial "Automatic Document Importing into OpenVPMS" as the method for setting up the Task Scheduler is different in Windows 7 to that of Windows XP.
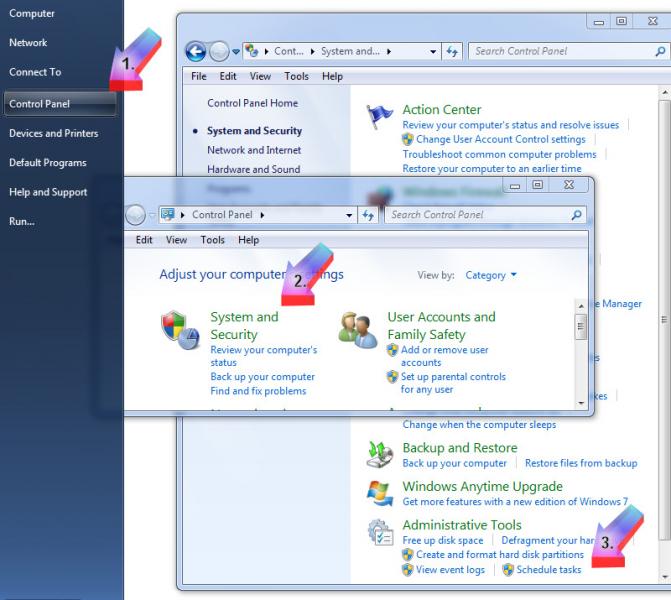
Click Start | Control Panel (1) | System and Security (2) | Schedule Tasks (3):
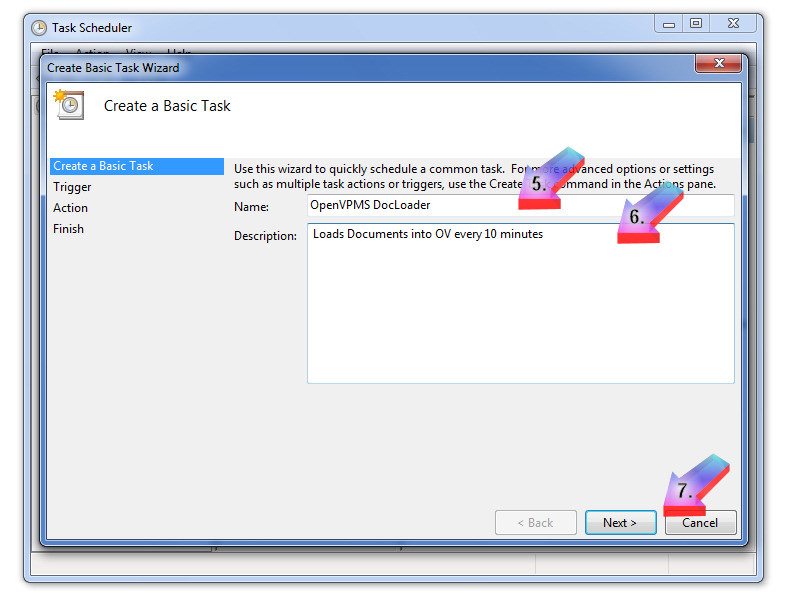
Click Create Basic Task (4):

Enter a Name(5) and Description (6) for the task, and click Next (7):
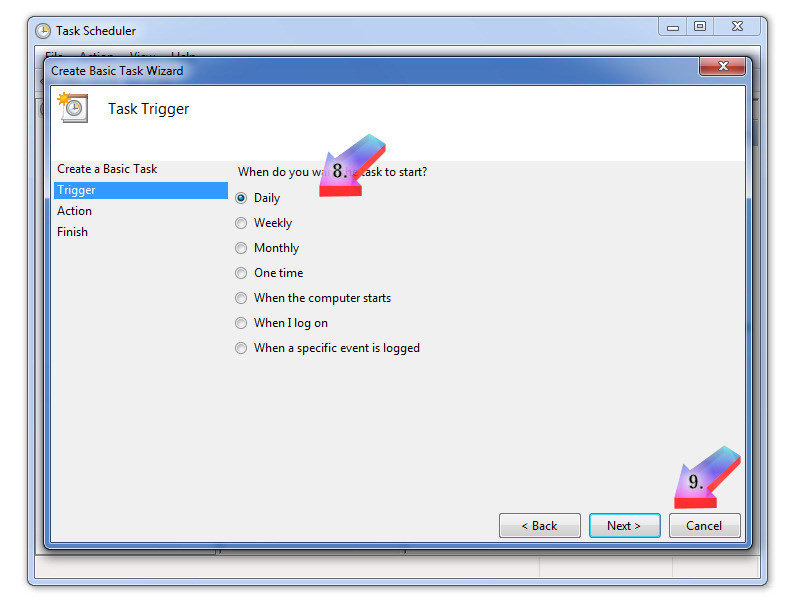
Click Daily radio button (8) and click Next (9):
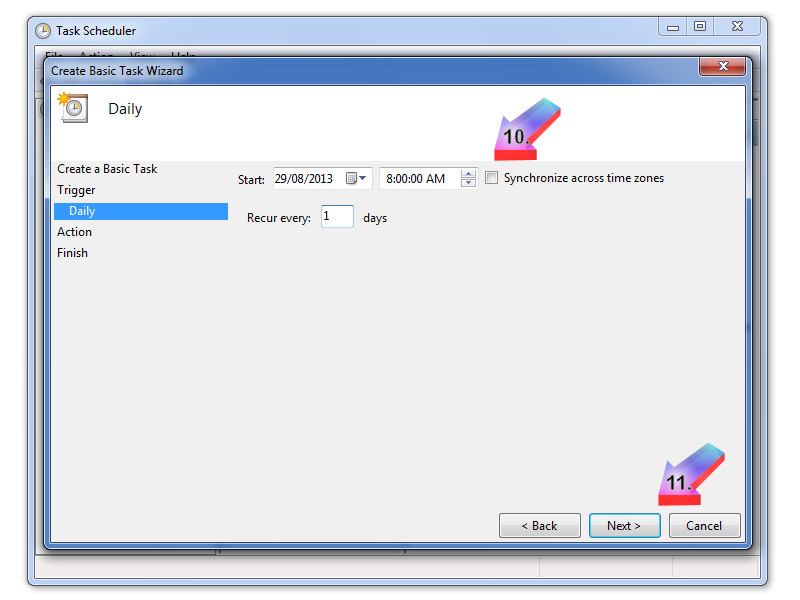
Select Start date (usually left as Today) and a time (10) and click Next (11):
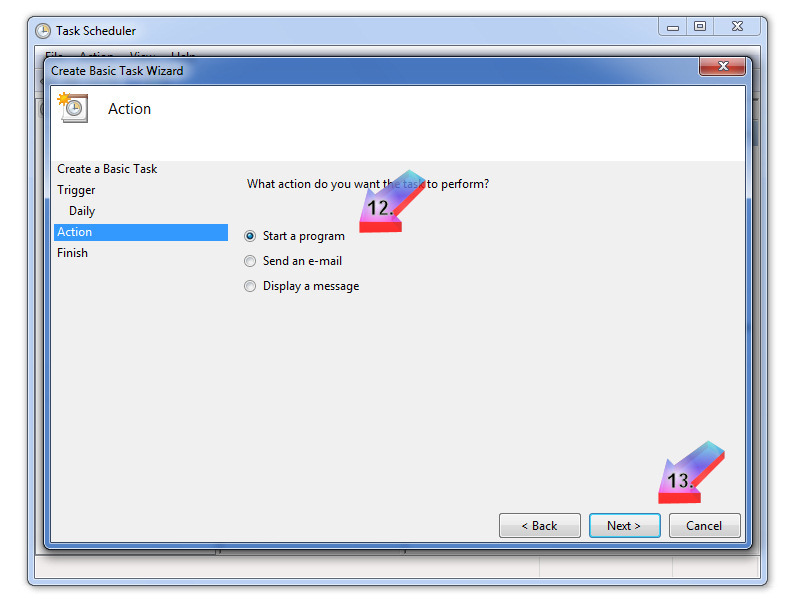
Click the Start A Program radio button (12) and click Next (13):
Copy this command line complete with quotes and paste into the Program/Script field (14):
C:\OpenVPMS\current\bin\docload.bat --byid --source c:\importfolder\in --dest c:\openvpms\importfolder\archive --verbose -o --regexp "^[a-zA-Z]{0,2}(\d+).*"Copy and paste this line into the Start In field (15).
C:\OpenVPMS\current\bin\
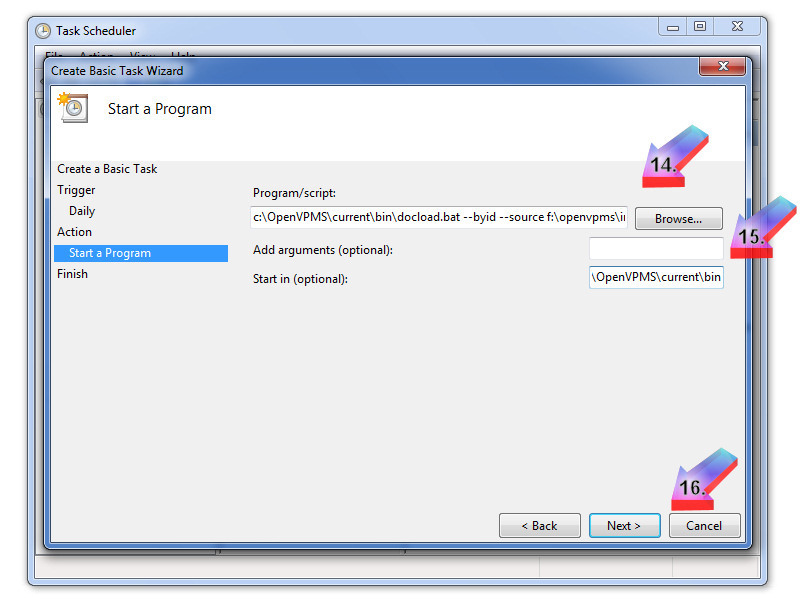
Note: once you've pasted in these two parameters, you will need to edit these lines as per the table below:
| C:\OpenVPMS\current | ---> | The location of your current OpenVPMS installation |
| c:\importfolder\in | ---> | The location of the folder containing incoming documents |
| c:\importfolder\archive | ---> | The location of the folder containing documents that have been successfully added to OpenVPMS |
| C:\OpenVPMS\current\bin | ---> | The location of the bin folder in your current OpenVPMS installation |
Once this has been done, click Next (16 in image above).
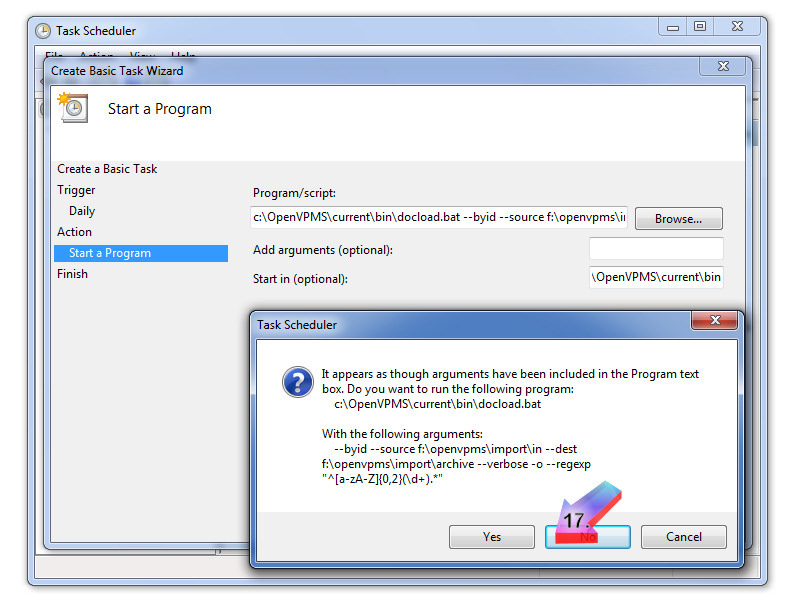
This message will appear - click Yes (17):
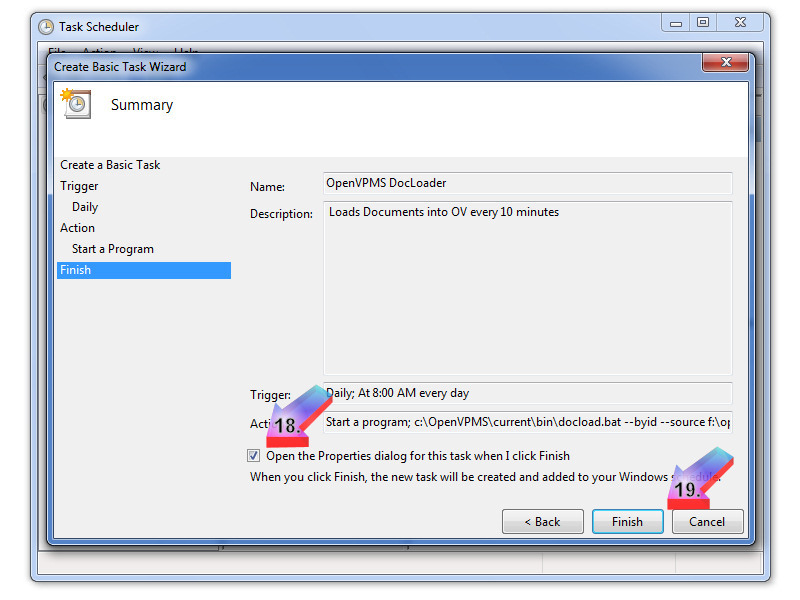
Click to check Open the Properties... box (18) and click Finish (19):
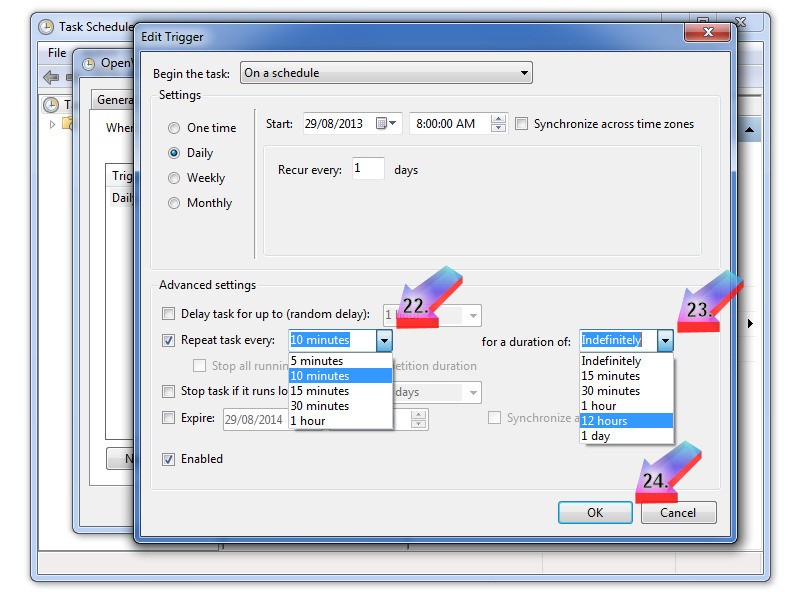
To fine-tune frequency of operation, click on Triggers tab (20) and then Edit (21):

Select how often (22) you want to run the scheduler and for how long (23) and click OK (24) :
You're done.
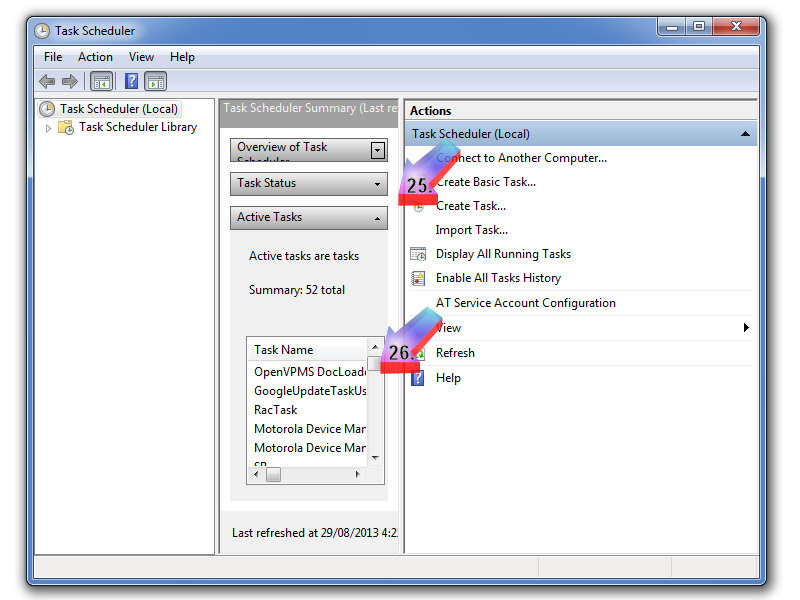
If you need to edit this task, click on Start | Control Panel (1) | System and Security (2) | Schedule Tasks (3) | Active Tasks (25), click on OpenVPMS DocLoader (26)....
.... and click on Properties (27):
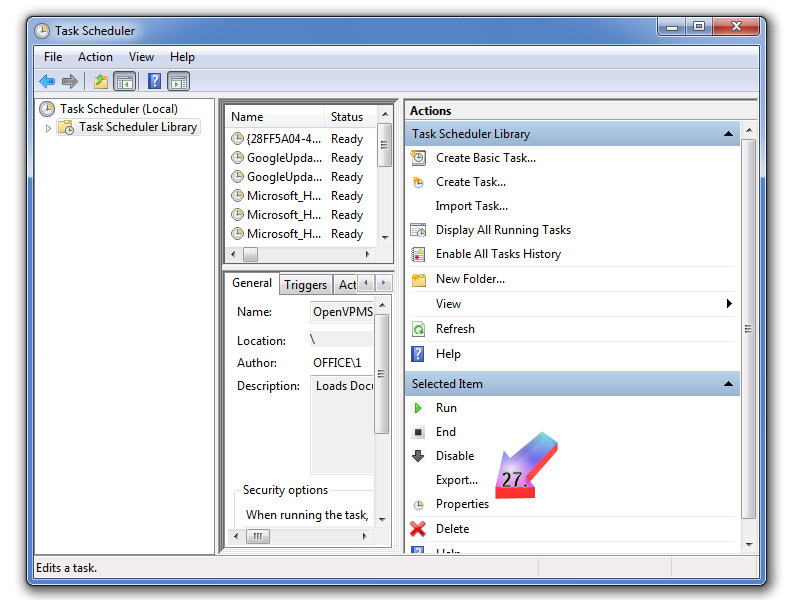
You'll then be at the window as per image above at (20) and (21).
Page created 30-Aug-2013 by Yuri Sos
Setting up electronic deliveries from Provet
By using the electronic supply chain interface it is possible to receive deliveries electronically from Provet. The setup requires a fair bit of configuration but once setup is a massive time saver as deliveries no longer need to be manually entered.
After following these setup instructions you will also be able to order electronically from Provet using OpenVPMS.
Before doing this you need to setup the system with product supplier codes which match with the Provet codes.
If you edit a product you will see the supplier tab.
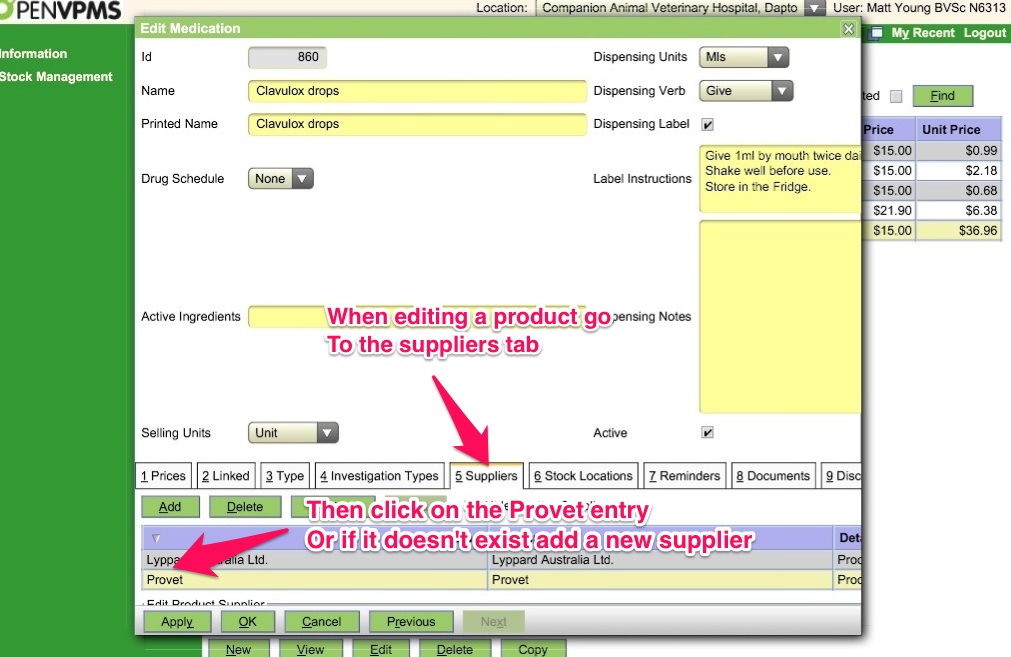
Select this and expand the Provet entry if it exists. If not add a new supplier (Provet). The critical information that needs to be entered is the reorder code which needs to be matched with a Provet code and the package size.

This can be done manually or you could get an implementer to do it in bulk for you. I contacted my rep and gave her a csv list generated using one of the reports in OpenVPMS of all products and then she added the Provet codes to each product for me. I then went through and manually updated the information.
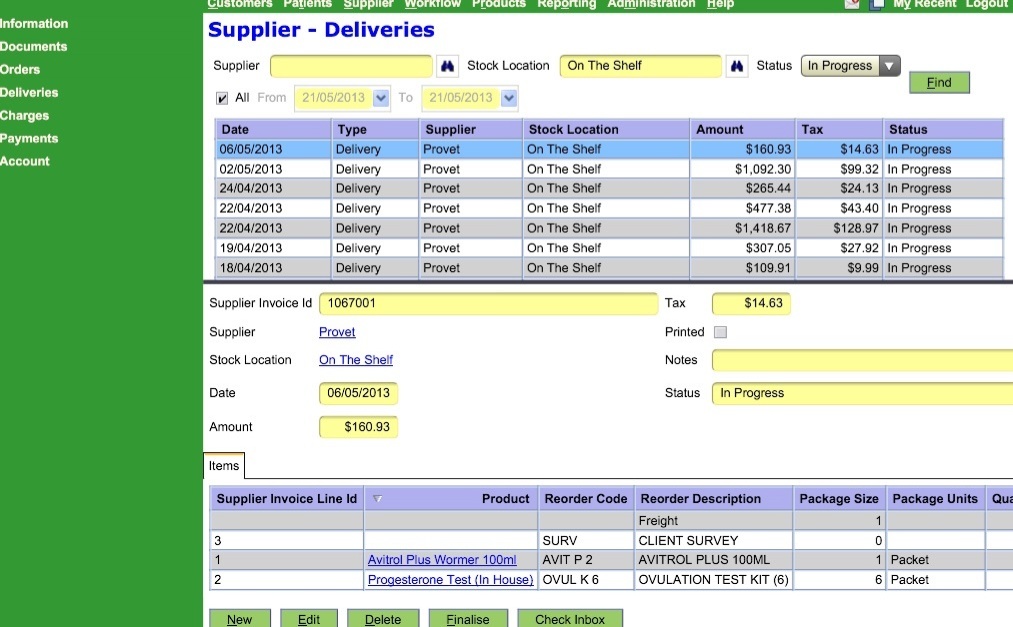
Once that is setup you need to setup the connection to Provet. Go to suppliers > information and edit your Provet entry. The information is entered under the stock location. The service URL is https://vethub.provet.com.au/openvpms/registryservice.svc?wsdl

The other account information (password, etc) can be obtained via your provet account manager.
That completes the setup.
When the customer service staff enter your delivery you receive an email. In general I find that this occurs before the order arrives in most cases. When a delivery needs to be entered go to the suppliers > delivery workspace press the check inbox button (if it's not already showing). Then press the find button to refresh your screen. The invoices arrive as in progress deliveries. Edit the appropriate invoice and make any necessary adjustments. (Eg. Delete the lollies entry). Any products without Provet codes such as new products will need to be matched up with the product on your system but assuming you did all he hard work before this should be minimal. Once you have confirmed all is correct finalise the delivery.