Navigation
This part of the handbook is to help you get oriented within the system. It also offers information about the various modes of usage that you might encounter.
Navigation and Layout
Layout
Let's get oriented. The basic user interface for OpenVPMS looks like this:
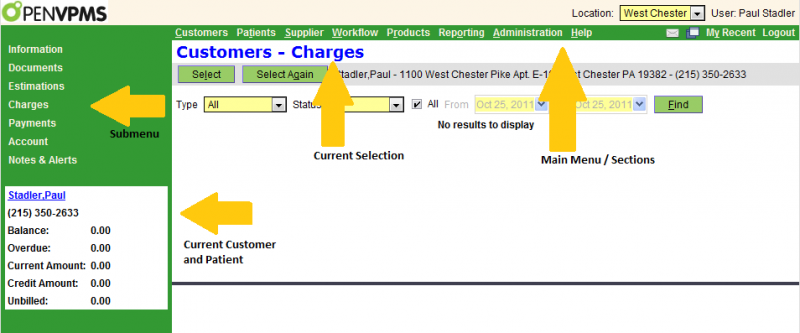
There's a lot going on here. Let's step through each element.
Main Menu / Sections
In this top area, you'll be able to see all the primary sections of the system. You may not see all of them. Each of these sections houses a different type of functionality of the system. Here's brief list of what each section contains. (Note: This list is not remotely exhaustive!)
- Customers: Billing, account information, basic contact information, etc.
- Patients: Basic patient information, medical records, reminders, etc.
- Supplier: Suppliers and their contact information
- Workflow: Scheduling, task lists, messaging, investigations
- Products: The full product catalog, and configuration
- Reporting: Till balancing, financial reports, patient reports, reminder printing
- Administration: System setup
- Help: Help
You'll come to understand what is in each of these through usage of the system. You're encouraged to click through each one, and explore what information you can find in that section.
Submenus
Each section has its own list of subsections. These are different in each section you go to. We won't enumerate all of them here, but will discuss elements in each of these submenus throughout the rest of the handbook.
 Tip: You can always tell where you are (main and submenu) by looking at the blue lettering at the top of the page. It's labeled "Current Selection" in the screenshot above.
Current Customer
To the left of the screen, the current customer and patient information is displayed. The most useful information about customers and patients is displayed here. This is to accelerate your workflow. It's not convenient to have to dig deeper into the customer and patient records to find basic information. You'll find information here such as:
- Contact information
- Alerts and warnings about the customer or patient
- Current balance
- Age, weight, breed
Other Elements
There are other elements on the main screen that aren't highlighted in the screenshot above. See if you can find them! Each of these has a useful function in the system.
Navigation
Action Buttons
Any of the large buttons, that are green rectangles in the screenshot above, perform a meaningful action in the system. You will find many of these throughout the system. Action buttons can have many meanings from deleting information, to finding or printing information.
These buttons are generally located at the bottom of a screen or pop-up window. When they are at the bottom of the window, remember that they apply to everything in that window. For instance, if I click an "Edit" button, it will then edit the entire record that is current displayed. Go ahead and try it!
Lists
Sometimes action buttons are not at the bottom of the screen. In this case, they are usually representing a list. The screenshot above has two big action buttons on the screen. Can you find them?
The reason the "Select" button is at the top is because it's controlling a list that is about to be displayed on the screen. You'll find this type of button throughout. Look for it in these areas:
- Patient lists for customers
- Invoice items
- Reports
- Product lists
You'll find that adding records to a list happens in two different ways. For larger things (top level data like customers and patients), there will be an action button ("New") at the bottom of the screen. For smaller items (like invoice items) you may find an "Add" button at the top of the list.
Tip: When editing lists, the current editing window counts as an item of the list. Go ahead and try it!
Shortcuts
For those that are inclined to be as efficient as they can, keyboard shortcuts are available. Anywhere that you see an underlined letter, you can hold down "Alt", and hit that letter (or number). This will have the same effect as clicking on it.
A second shortcut is the blue underlined items. These are hyperlinks. They will generally jump you to another section in the system. You'll find them almost everywhere throughout the system. It's part of what makes getting around very easy.
Searching
This chapter discusses the various ways to retrieve and input information. Getting familiar with the various ways to do this in OpenVPMS will help you navigate the system effectively. It turns out that finding and entering information rely heavily on one thing in OpenVPMS: searching.
There are numerous times that you might want to find information in OpenVPMS. Let's start with the simple case of looking up a user. Keep in mind, that this same strategy can be used for looking up prouducts, patients, and almost every other type of information you might be looking for.
Here's the select box in the patients section. You can get to this by clicking Patients->Select.
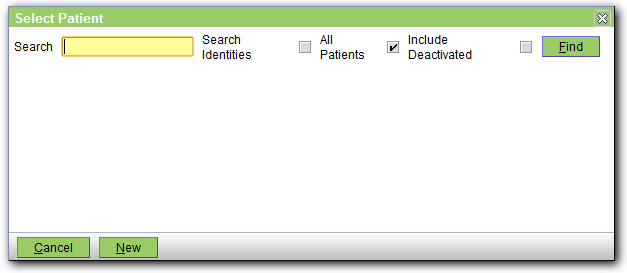
There are several elements here. Let's discuss each one.
First, you'll notice the search box. This is where you can enter the actual text that you're looking for.
Second, there is a series of tick boxes. Each tick box is to the right of the item it represents. Note that in the screenshot, the "All Patients" tick box is checked. This means that this search will search throughout all of the patients in the database. This is meaningful because the default in the system is to search through all the patients for the current customer. If no customer is selected, it will look through all the patients however.
Next, we see the Find button. You will see this button throughout the system. It's very important. Sometimes, it means that you'll initiate a search, and sometimes it will re-run an existing search that happens to be on the screen.
Tip: Get in the habbit of clicking the find button when you see it on the screen. This will refresh the information that is displayed.
At the bottom of the dialog box, you'll see the Cancel and New buttons. The Cancel button will close the window and stop the current search. The New button is there for convenience. If you happen to be looking for something that isn't in the system yet, you can click this to add that item.
Imagine that we're creating an appointment for a new patient. Maybe we're not sure that it's a new patient, so we search. Having not found the patient we're looking for, we can click New right from that screen to add the patient to the database. This is a convience feature because there is another (longer) way to add a patient that is discussed in the Patient section.
After clicking Find, you will see a list of all results in the system that match the criteria you've specified.
Wildcards
What if we only know part of the thing we're looking for? This could make it difficult to find a particular item. Not to worry, OpenVPMS has a mechanism for searching for just part of a string. In order to do this, we use the wildcard character "%". Take the following example:
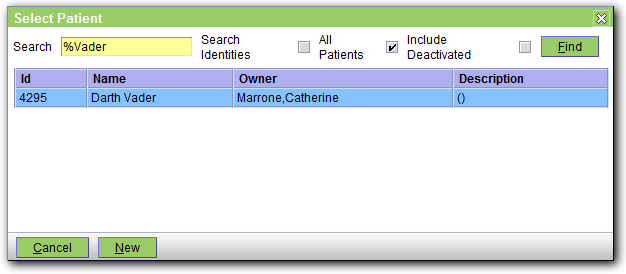 In this example, we were sure that our patient was "something" Vader, but couldn't remember the first part. To search for "something", simply put a "%" in the search string, as shown in the screenshot. Note that it has returned Darth Vader as a result. And before you ask, yes, this cat is actually named Darth Vader.
It also turns out that there is an implied "%" at the end of every search string. That means that these two search strings are identical: "%Vader" and "%Vader%". This again is for convenience. Generally, you would only need to type the first couple letters of the thing you're searching for and it will come up. If I'm looking for all the patients starting with "Fi", I can just enter "fi" and I'll get a list of "Fido", "Fidette", "Fidel" or any other "Fi%" name.
Tip: Searches are case insensitive. You don't need to capitalize anything.
Tip: You can hit enter instead of clicking find to run the search. Once you've found the item you're looking for, you can click on it to select it.
Lookups
There is another very frequent case that you'll be searching for information. These are lookups. There are many forms in the system that require you to enter information.
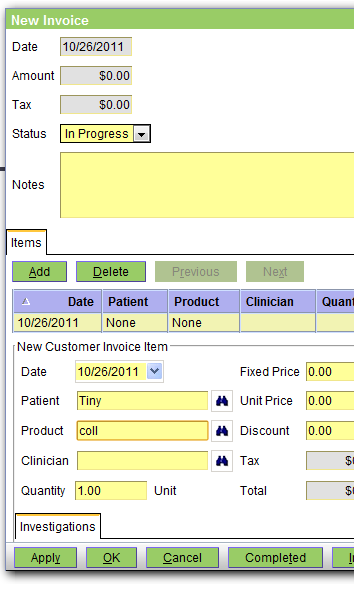
These fields are almost the same as the search dialog above, with one difference: searching is enabled right in the field you're trying to fill out. Let's take a look at an invoicing screen.
 This screen is discussed in detail in the Customers section of the manual.
The point of interest right now, is the binocular symbols just to the right of the Patient, Product, and Clinician fields.
As you may have guessed, clicking on the binoculars brings up the search dialog from above. You should have no problem finding items by clicking on the binocular, and the following the instructions above.
However, that can be tedious if you're entering a lot of data. So, the designers of OpenVPMS have made it easier by adding a shortcut. You don't have to click on the binoculars if you already know a little bit about what you're looking for.
Let's say that the patient Tiny needs a Collar. In order to add that to the invoice, I can simply type in the first couple letters and then hit enter.
If there are more than one thing that start with the letters I'd typed in, then it will display a list of possible matches. The same thing applies for any field with binoculars next to it. Many fields you'll use over and over.
For instance, if each Doctor's name starts with a different letter, you can simply type the first letter and hit enter in the Clinician field shown here. Also, the same restrictions as in the default search dialog apply. So, searching for a patient in this field, will limit the search to patients of the current client. All of these restrictions are designed to make using the system more efficient. Give it a try and see!
Tip: There's no need to go to the search dialog if the binoculars are there to help you.