Reports
The reporting section of OpenVPMS is possible the most comprehensive section that you'll deal with day-to-day. This area contains many types of reports. Hopefully the mystery can be mitigated in this section.
Till Balancing
Till balancing is how we keep track of money in OpenVPMS. At the end of the day, many practices will "close the till". This is the tool to accomplish that. First let's look at the display.
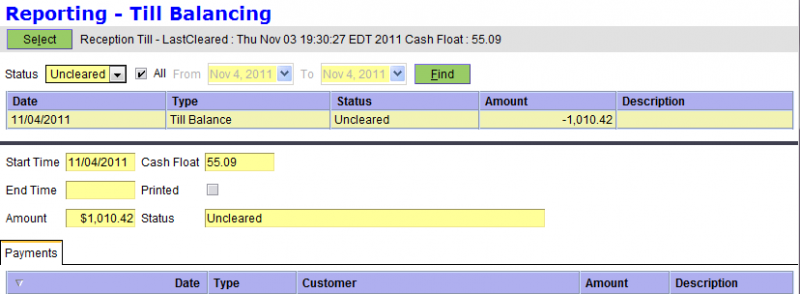
This screen allows you to search for balances using date criteria, as well as status. The status is either "Cleared" or "Uncleared" (or both).
When a balance is "Cleared", that money has been reconciled with what's actually in the till. The till comprises actual cash on hand, checks, and records of online transactions such as credit cards, EFT, or any other transfer types you have setup (such as debit). To clear the till, is to move money out of the operational part of the business. These funds are no longer available for refunds, or any other usage except depositing. This is covered in the deposit section.
Upon clicking on one of the balances that your seach yields, you will see all the payments associated with that balance in the area below.
Closing the Till
We presume that most practices will want to check the till balance daily. So, this makes a daily procedure, usually at the end of the day.
In order to close the till, first select the balance you want to clear. There should be only one that is unbalanced. Next, print (or preview) the current balance by using the "Print" action button at the bottom of the screen.
The goal, is to ensure that all the cash on hand, and receipts from electronic transactions match what OpenVPMS believes happened for the day. The printout will show totals for each transaction type. The sums of cash, cheques, credit on hand must match the printout. If it does not, then an adjustment must be made to document the discrepancy. When this happens, please work with your financial controller to reconcile the situation.
Once the balance has been confirmed, you can click the "Clear" action button at the bottom of the screen. This button will prompt you for a new "Float" balance. Type in the new amount of cash that has been left in the till. This is the balance that the practice will begin with the next day.
Once this is complete, remit all payments to whatever location has been established for this, and you're done!
Adjusting the Balance
Another button at the bottom of the screen is the "Adjust" action button. This button can be used to make an adjustment. If some money is not found, or there is extra money, this can help you balance the till. This functionality is considered advanced, and depending on policy, may be unused except for by your financial controller.
Deposits
The deposits section is for tracking bank deposits. This functionality outside the scope of this handbook at this time.
Debtors
Debtors are people that owe the practice money. This reporting section allows you to track who owes the practice money, and several other pieces of information to understand debt status.
More than just status, this section also allows you to take action against the debt, and file petitions for reclamation through whatever format you'd like. The default in the system is to send an account statement, but you can be more or less aggressive simply by changing reports (with the help of your administrator).
Let's take a look at the screen to understand a little more. To get to this section, click on "Reporting" then "Debtors".
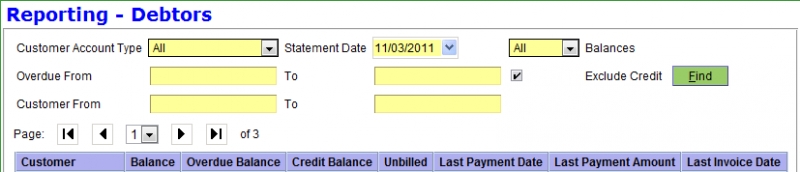
The interface has several controls. Here's a brief summary of each:
- Customer Account Type: The type of customer you'd like to filter.
- Statement Date: The "as-of" date that you're interested in. This allows you to look and see who your debtors were at a particular point in the past.
- Balances: The type of balances you're searching for. Discussed below.
- Overdue From,To: How many days from the statement date are you interested in?
- Customer From,To: Searches for particular customer names.
- Exclude Credit: Shows only balances owed to the practice, not the other way around.
Searching
It's probably that you don't care about all your debtors at any given moment in time. The search functionality ("Find" button) lets you whiddle down the results until you find exactly the set of customers that you're interested in.
There are two types of balances that appear in the search: current and overdue. The current balances come from any invoice that is "Completed", but not "Finalized". All overdue balances have been finalized. You'll notice some overlap between the current balances here, and the works in progress report section. If, for example, we wanted to send notice to all customers that are overdue, we would want to filter out the current balances by selecting "Overdue" in the "Balances" selector.
The next filter we'll discuss is the "Overdue From,To" filter. Here, you can filter for balances based on their age. If, for instance we'd like to get all balances that are more than 90 days old, we might set the overdue "from" date to 90. If we wanted to find only balances overdue from 60-90 days of age, we could put in from=60 and to=90. Note that the balance type must be set to "Overdue" for this to work.
"Customer From,To" allows you to filter the list by customer names. If, for instance you wanted to process just names starting from A-F, you could simply put "A" in the from field and "G" in the to field. Note: it goes up until the last letter but doesn't include it.
Actions
Once you've found the set of debtors that you're interested, you can take action. The buttons at the bottom of the screen allow you to perform several actions. Here's a brief summary:
- Send All: Prints out the related report (default is Account Statement) for all customers in the list.
- Print: Prints a single related report for the selected customer.
- Report: Prints a report about all the customers in the list.
- End Period: Converts all completed invoices to finalized invoices.
Work in Progress
The Work in Progress area is a reporting area that shows all invoices that are "In Progress" or "Completed", but not finalized. We won't go deeply into this because it's rather straight forward. This area is mostly for house keeping.
Many practices may have a policy to prepare invoices ahead of when they're needed. A prime example of when this is benificial is when customers might be coming to pick-up medications or other items. It's useful to create those invoices ahead of time because it will facilitate a smooth checkout later. However, sometimes the customer never shows up. There is where you can see the progress of all those types of situtaions.
It is recommended that once works in progress reach a certain age, they are dispatched to maintain data cleanliness and to ensure that piles of unpurchased inventory are not accumulating anywhere in the practice.
Reminders
Reminders are a critical part of the business. They help make sure that you're effectively leveraging your customer base, and making sure their pets stay healthy. This reporting area helps you get from the reminders in the system, to actual print-outs (or email reminders) to communicate with your customers.
Here's a look at the basic screen:

This screen allows you to search for reminders, and then print them. The search functionality is similar to others in the system. You can select a start and end date (and a type of reminder if you wish), and click "Find" to generate a list.
Once you've generated the list, you'll notice several pieces of information about each reminder that's found. These are:
- Due Date: As entered in the system through the medical records.
- Next Due: Can someone offer a description of this field?
- Reminder Type: As configured in the system.
- Customer: The customer name.
- Patient: The patient name.
- Reminders Sent: How many reminders have been sent for the item due.
- Last Sent: The date this item was last sent.
- Error: Any error that has occured in generation of this reminder.
- Action: The next action to take when clicking "Send All".
Reminders are one of the more complex aspects of OpenVPMS. The implementation is extremely flexible, but as a result has some learning associated with it. We won't delve into the details of how to configure reminders here. This is a task for your system administrator and/or implementor.
Generating Reminders
To generate reminders, click "Send All" at the bottom of the screen. This will begin a process to print out all the reminders that are in the current search results.
Once they have been printed, they will be marked as sent in the system, and will not print again. If you have the need to reprint, you should do it immediately while the printing process is still active. Before closing the print window, the system will ask if you'd like to reprint. This is useful if there was some error with the printer, or otherwise.
If you'd like to generate a single reminder, you can use the "Print" button at the bottom of the screen. This won't mark the reminder is printed, but allows you to generate an individual reminder ad-hoc. Note however that this functionality does not work with grouped reminders.
Other Reports
The general reports section under "Reporting" is used for all other reports that you might want to run in the system. These reports are customizable and as such will be different for most implementations of OpenVPMS.
To run a report, click on it and then click "Run".
You'll notice that some reports will ask you for more information. When this happens, type in the information and click "Ok" to print the report.
 Tip: Anytime you see "Preview", you can view the report without printing it.
In the process of running the report, it's also possible to export the data. This is useful if you'd like to perform some other calculation on the data, or send the information to someone in a different format.
Don't forget to get involved in the OpenVPMS community. There are many reports that users have created and have contributed back to the community that don't ship with OpenVPMS. Working with your administrator, you can load any of these community created reports.