Customers
The Customer workspace is used to handle customers.
Information
This screen displays information about the current customer - or if there is no current customer, a Select button allowing you to select a customer, and a New button to create one. It is also the first screen displayed after you log in - if you are new to OpenVPMS you might want to check out Introduction and Concepts.
With a current customer, the screen is as follows:

The screen areas are as follows:
(1) the information panel - the fields here are as follows:
name - this provides a link back to this customer information screen, ie pressing it on the Account screen, brings you back here
ID - the customer's ID number
phone - the phone number displayed here is the customer's preferred one. If the name of the phone number contact is other than the default 'Phone Number' then the name will also be shown - eg 9876 1234 (Home).
email - the customer's email address, clicking this brings up the Send Email window
Balance - the current account balance - ie what the customer owes us
Overdue - the part of the balance that is overdue, ie is overdue for payment
Current Amount - the part of the balance that is due to activity in the current accounting period
Unbilled - the total of any transactions that have not yet been finalised
Projected Amount - the sum of Balance+Unbilled - ie what the balance will be after the unbilled transactions are finalised
Alerts - shows any current alerts for the customer - you can click on the alert to display its details, or if there are more than 4 and 'More...' is displayed, press the View All button to display all the alerts
SMS Button - this will be displayed if the customer has an SMS enabled phone number - press it to send an SMS message
(2) the select area - this shows the customers name and address (which will be the billing address if there is one, else the preferred if is there is one, else the first found) and phone number (which will be the Home number if one has been recorded), and two buttons:
Select - pressing this brings up the Select screen to let you select another customer
Select Again - pressing this brings up the same screen but with you previous selection settings. This allows yoiu to quickly select another customer from the list when the one you chose previously was not the correct one, ie it was the wrong Jennifer Chan
(3) the header area - for the descriptions of these fields, click here
(4) the tabs area - for the descriptions of the fields in the Account Type and Appointments tabs, see below, for the others, click here
(5) the bottom buttons - these are as follows:
New - create a new customer
Edit - edit the current customer - note that you will be editing the compete customer record and all the tab items
Delete - delete the current customer - a confirmation window will appear
Merge - merge this customer with another - a select screen will appear to let you select the customer to be merged in. After you have selected the customer, a confirmation window will be displayed. Note that header information (name, title, etc) of the current customer is retained, but the tab items (patients, contacts, etc) are simply combined, ie there will be two addresses, two phone, numbers, etc etc, and you will need to edit the resulting customer record to delete the unwanted parts.
Note that the Merge button will not be displayed unless the user is a member of the Administrator category - see Concepts|Users.
Account Type tab
This shows the Account Type and its parameters as follows:
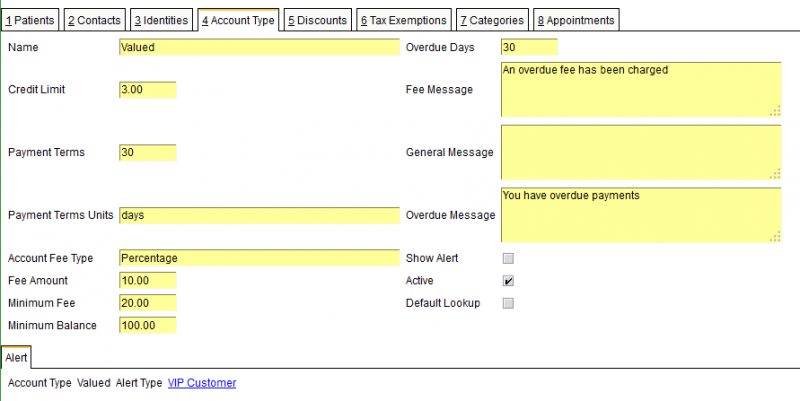
For an expanation of the fields see Administration|Lookups|Customer Account Type
Appointments tab
This tab is used to display the customers appointments as follows:

You can see that this operates as a select screen. By default the Status is set to 'Pending' which will thus show just the customer's current and future appointments. However, you can select either All or one of the other Appointment statuses to display historical data.
If you click on the patient name that will take you to the patient's Medical Records screen. If you click elsewhere on the line this will take you to the Workflow|Scheduling screen.
Create/Edit
This is the screen used to create and edit the customer record.
Note that if you are adding a new customer & patient, the easiest way is to use the New button on the Customers|Information screen, fill in the customer details, and before pressing OK to complete the customer add, click the Add button on the Patients tab, and then click the binoculars icon following the Patient name field - this will give you the Patient Select screen on which there is a New button so that you can add the new patient for this new customer.

The fields in the header section are as follows:
Id - the customer's ID
Last Name - the customer's last name - note that you need to provide this even if the customer is a company
Title - the customer's title - select from those allowed - these are controlled by Administration|Lookups|Person Title
Initials - the customer's initials -these are best entered as 'J T' or 'J.T.' rather that 'JT' - the last will be propercased to 'Jt'.
First Name - the customer's given name(s)
Company Name - enter the company name if applicable
Referred By - if applicable, select the appropriate value from the list - these are controlled by Administration|Lookups|Customer Referral
Preferred Vet - if applicable, select the appropriate value from the list - these are controlled by Administration|Lookups|Customer Vet. Note that this is a documentation field - it does not set the default clinician for this customer.
Insurance Plan - if applicable, select the appropriate value from the list- these are controlled by Administration|Lookups|Customer Insurance. As of OpenVPMS 2.0, insurance should be managed per patient, via Patient|Medical Records|Insurance.
Travel - if applicable, enter appropriate information such as 'charge 100km for visit'
Active - untick this to deactivate the customer
Account Type - select the account type from the pull-down list. Initially the system has the following Account Types available: Normal (the default), Valued Customer, and Bad Debt. More can be added using the Administration|Lookups|Customer Account Type.
The Account Type can be used for reporting purposes (eg list all customer of type xxx), but more importantly it allows discounts to be applied (eg all valued customers get a 15% discount), and it allows customer alerts to be displayed (eg all Bad Debtor customers show with a red alert).
Practice Location - used to indicate the preferred practice of a customer, in multi-location practices. This is used as follows:
- in various reports to select a set of customers
- to select those customers for whom statements and reminders are processed
- potentially to change the content in documents as a function of the customer's preferred practice location (this requires tailoring of the varios document templates)
See also Local Procedures.
The 6 tabs Patients, Contacts, Identities, Discounts, Tax Exemptions, and Categories are documented below.
Note that in some cases, the tabs have a Hide Inactive xxxxx checkbox. This is present when the item being attached to the customer (ie the patient-owner, the patient-location, or the discount) can be deactivated (either by unsetting its Active flag, or if its To Date is in the past). In this case the item will remain attached to the customer, but the item will not be displayed and the customer will act as though the item was not attached. You can have these inactive items displayed by unchecking the Hide Inactive xxxxx box.
Patients tab
This tab is used to add/delete/edit a) 'Patient Owner' records and b) 'Patient Location' records.
Patient Owner - A patient can have multiple owners either at the same time (because the ownership is shared) or sequentially (because the patient passes from one owner to another).
The screen is as follows:
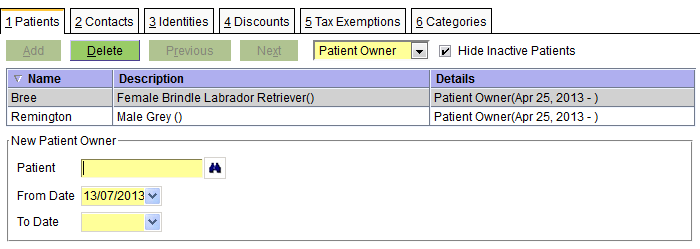
The fields are:
Patient - the name of the patient - if you use the binoculars to search you will be able (by ticking the All Patients option) to select a patient who has another owner and thus set up multiple ownership
From Date - the date from which the ownership started
To Date - the date on which it ended
Notes:
- If you do want to change the ownership of a patient, the easiest was to do it is to edit the patient record (rather than the customer record) since with the patient record, adding another owner automatically terminates the previous ownership.
- if you are simply adding patients to a customer, the easiest way to do this is to first call up the Customer|Information screen for the customer, and the click 'Patients' entry in the top menu line to switch to the Patients workspace and then simply press the New button to add the new patient to the current customer.
Patient Location - patient locations cope with the situation where the patient is owned by Dr Smith but lives at the Happy Horses stables. To cope with this, we have both Dr Smith and Happy Horses as customers. First we set up Dr Smith and his horse Ballantyne as normal. Then we set up Happy Horses as a customer, and add Ballantyne as a Patient Location record.
For the vast majority of cases, where the patients live with their owners, we don't need Patient Location Records.
The screen is as follows:
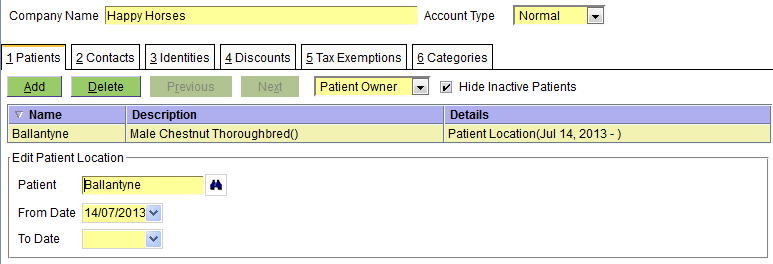
The fields are:
Patient - the name of the patient - note that the name search is done across all owners so that 'bal' will find Ballantyne
From Date - the date from which the location started
To Date - the date on which it ended
Note that given the above set up, if we go look at Ballantyne's information we see:
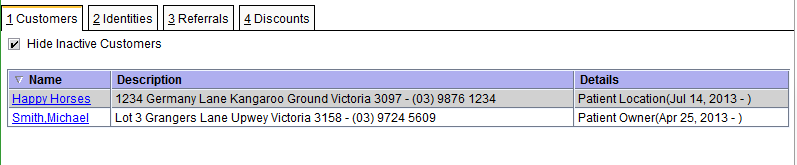
Note also that since a patient can only be in one place at a time, if you simply add a new Patient Location record to the patient, then the previous location will be automatically terminated.
Contacts tab
The Contacts tab (because contacts are used for customers, suppliers, etc) is documented in Concepts|Contacts.
Note that for good reminder control you should have one and only one contact (phone, email, or location) set with the purpose 'Reminder'. If you have multiple contacts with the purpose Reminder, then the first found will be used by the Reminder system. Similarly if you have no contacts set with the purpose Reminder, then the first contact found will be used for notifying reminders.
Identities tab
The Identities tab is used to set the customer's identities. Note that contrast with patients and products, customers only have one type of identity 'Code', however the customer can have multiple Code identities.
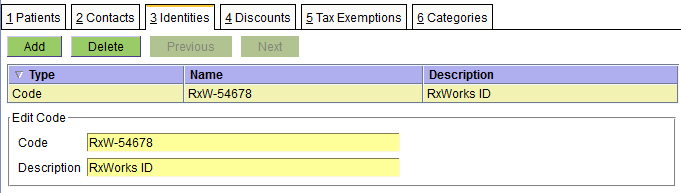
The fields are:
Code - the code - this can be anything appropriate
Description - an optional description of what the code represents (in the above case 54678 was the client number in the RxWorks system that this data was converted from)
Discounts tab
This tab is used to set the discounts that apply to the customer - see Concepts|Discounts for background.
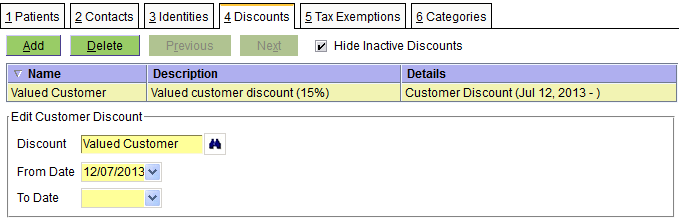
The fields are:
Discount - the discount - note that this can either be a discount, or a discount group
From Date - the date from which the discount applies
To Date - the date on which the discount ends
Taxes Exemptions tab
This is used to exempt the customer from taxes. See Concepts|Taxes for backround information.
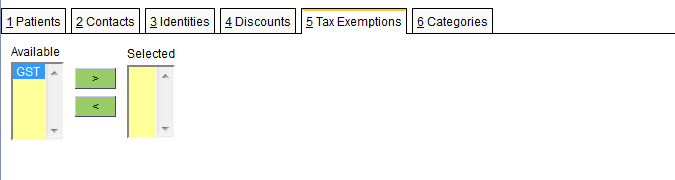
Use the arrows to move the selected item from the Available list to the Selected list and vice versa.
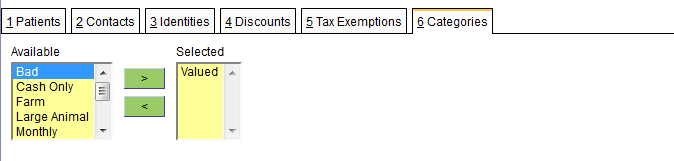
Categories tab
This is used to set the categories (zero, one, or more) to which the customer belongs. See Concepts|Categories for background information.
Confirm Delete
When you press the Delete button on the Customers|Information screen, a confirmation window will appear.
If the customer is not in use and can be deleted, the window will simply ask you to confirm the delete. Press OK to confirm or Cancel to abort.
If it cannot be deleted because it is in use, the text will be "xxxx has relationships and cannot be deleted. Do you want to deactivate it instead?"(where xxx is the name of the customer you are trying to delete). Pressing OK will unset its Active flag, Cancel will abort.
Confirm Merge
After you have pressed the Merge button on the Customers|Information screen and selected the customer to merge, a confirmation window like the following will appear.
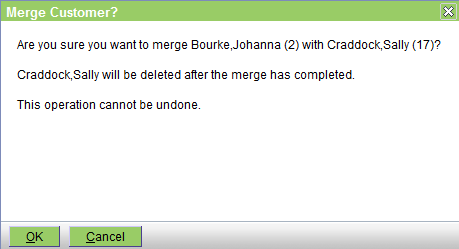
Press OK to merge the customers, or Cancel to abort.
Customer Alerts
This screen is displayed if you press the View All button on the customer information panel to display the customer's alerts.

The top part of the window shows the alerts. Selecting one displays its details below.
Click here if you need clarification of the meanings of the fields.
Documents
This screen displays the documents for the current customer - or if there is no current customer, a Select button allowing you to select a customer.
This screen shows the details of the customer's documents. As you can see below, there are three different types: Attachments, Letters and Forms. The first two support 'versions', ie previous revisions of the document. See Concepts|Documents for background.
The top half of this screen functions like a standard select screen. As well as by date, you can select by:
Type - this can be set to All (ie all document types), or Attachment, Form or Letter
Status - this can be set to All, In Progress, Completed, or Finalised
The table shows the documents that match the selection criteria. The column headings are self explanatory. Clicking on the entry in the Document column will cause the document to be downloaded and displayed. Note that for Letters the Document column shows two icons like ![]() . If you click on the right-hand one, the pdf file containing the letter will be downloaded and displayed. If you click on the left-hand one (or the name of the document) then the word processing document will be downloaded and you can open it in your word processor and save it and then edit it. (You need to save it as it is opened read-only.) After editing the file, you can then use the Edit button to edit the letter and upload the revised file.
. If you click on the right-hand one, the pdf file containing the letter will be downloaded and displayed. If you click on the left-hand one (or the name of the document) then the word processing document will be downloaded and you can open it in your word processor and save it and then edit it. (You need to save it as it is opened read-only.) After editing the file, you can then use the Edit button to edit the letter and upload the revised file.
The bottom part of the screen shows the details of the selected document.
The buttons are:
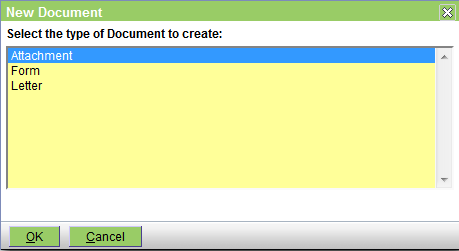
New - create a new documment - a window will open allowing you to select the type
Edit - edit the selected document record (not the document itself - though see above). If the document has status Finalised you will not be able to edit the record.
Delete - delete the selected document - a confirmation window will be displayed. If the document has status Finalised you will not be able to delete it.
Print - print the selected document (or preview it or email it)
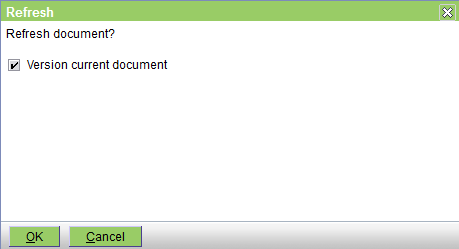
Refresh - this button only appears when you have a non-finalised letter selected. Pressing it will (if the letter was generated from a template) refresh the letter by regenerating it from the template. This is useful if you have modified the template. A confirm window will be displayed.
Create/Edit Attachment
This is the screen used to create or edit an attachment document in the customer's Documents list. See Concepts|Documents for background.
The fields are as follows:
Start Time - the date on which the entry was created - defaults to today
Description - any pertinent description
Status - this can be In Progress, Completed, or Finalised. In Progress implies that you are still working on this; Completed implies that you have finished - but the entry can still be editied; and Finalised means that it is really complete and can no longer be edited.
Printed - this box will be checked when the form has been printed
Attachment - press the Select button to attach the file - after the file is attached its name (notes.txt in this case) is shown here.
The Versions tab shows the previous versions. Note that you can use the Add button to add another, but you can also use the Select button. If you use the Select button to attach another file, then the previous 'top' version will just be pushed onto the version list.
Create/Edit Form
This is the screen used to create or edit a form document in the customer's Documents list. See Concepts|Documents for background.

The fields are as follows:
Start Time - the date on which the entry was created - defaults to today
Description - any pertinent description
Status - this can be In Progress, Completed, or Finalised. In Progress implies that you are still working on this; Completed implies that you have finished - but the entry can still be editied; and Finalised means that it is really complete and can no longer be edited.
Printed - this box will be checked when the form has been printed
Form - select the form to print - these are the document templates that are of Type 'Customer Form'
Create/Edit Letter
This is the screen used to create or edit a letter document in the customer's Documents records. See Concepts|Documents for background. As discussed there, you can either generate a letter from a template, or upload any file.
First let's look at the screen shot for a new letter:
The fields are as follows:
Start Time - the date on which the entry was created - defaults to today
Description - any pertinent description
Status - this can be In Progress, Completed, or Finalised. In Progress implies that you are still working on this; Completed implies that you have finished - but the entry can still be editied; and Finalised means that it is really complete and can no longer be edited.
Printed - this box will be checked when the letter has been printed
Template - if you want to generate the letter from a template, enter the template here - these are the document templates that are of Type 'Customer Letter' - the generated document will be an editable word processing file
Document - if you want to simply upload a file as a letter, press the Select button. A document select window will open allowing you to select the required file. If you upload a word processing file (rather than say a pdf or scanned image of a letter) then you will be able to edit it if needed.
Now the edit screen. The senario is as follows: you created an editable letter as above. Then you decided that you needed to modify it, so on the Customers|Documents screen, you selected the letter and then clicked on the actual letter to download it and open it in your word processor. You then saved a copy (as say Survey Letter-2), edited in the required changes and then saved it.
On the Customers|Documents screen you now press the Edit button to get the Edit Letter screen. You then press the Document Select button - this will open a browse window to allow you to select your 'Survey Letter-2' and upload it. The screen will then appear as below. The initial version has been saved as the previous version, and your new one as the new current version.
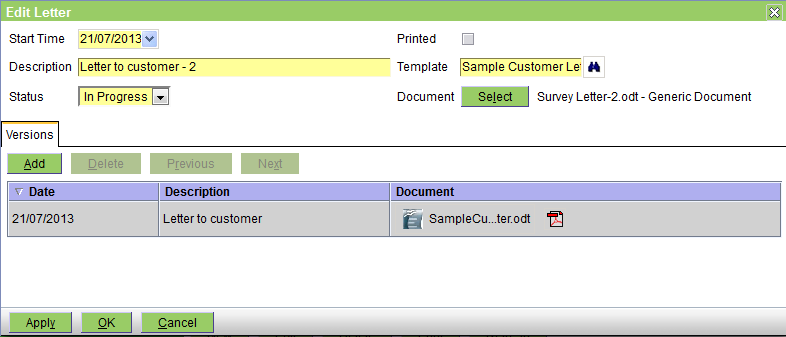
As intimated above, the Versions tab shows the previous versions. Note that you can use the Add button to add another, but you can also use the Select button. If you use the Select button to attach another file, then the previous 'top' version will just be pushed onto the version list.
Parameters
If a template containing parameters is selected (i.e. Fill-In fields in Microsoft Word, or Input Fields in OpenOffice Writer), a window will be displayed prompting for the values of those parameters. On OK, these will be merged with the document.
Confirm Delete
When you press the Delete button on the Customers|Documents screen, a confirmation window will appear. Press OK to confirm or Cancel to abort.
Confirm New
This window allows you to select the type of customer document to be created. Select the required one and press OK, else Cancel to abort.
Confirm Refresh
If you press the Refresh button on the Customer|Documents screen, then the window below will be displayed. Clicking OK will regenerate the letter from the template. If you leave the 'Version current document' box checked, then the previous version of the letter will be saved as the previous version, otherwise it will not be.
Pressing the Cancel button will abort the operation.
Estimates
This screen displays the estimates for the current customer - or if there is no current customer, a Select button is allowing you to select a customer. See Concepts|Estimates for background.

The top half of this screen functions like a standard select screen. As well as by date, you can select by:
Status - this can be set to All, Cancelled, Completed, Finalised, In Progress or Invoiced
The item area displays the matching estimates. The column headers are self explanatory. Note that the Description column is always blank. You can click on any column header to sort by that column.
The bottom half of the screen displays the selected estimate, its line items, and the details of the selected line item.
Click here if you need information on the Items fields or Customer Notes tab.
The buttons are as follows:
New - create a new estimate
Edit - edit the selected estimate
Delete - delete the selected estimate - a confirmation window will appear
Finalise - change the status of the selected estimate to Finalised - a confirmation window will appear. Finalising the estimate locks it from any further changes. If you confirm the Finalise, then a print window will open allowing you to print or email the estimate.
Print - print the selected estimate
Copy - copy this estimate to create another one
Invoice - generate an invoice from this estimate - the values used to create the invoice will be the 'high' estimate values.
Create/Edit Estimate
This is the window used to create and edit estimates.

The fields in the header are as follows:
Date - the date of the estimate - defaults to today
Title - enter a short useful description
Expiry Date - the date until which the estimate is valid
Notes - any pertinent notes - this will appear on the printed estimate
Low Total, High Total - the low and high total amounts for the estimate
Printed - this box will be checked after the estimate has been printed
Status - can be set to Cancelled, Completed, Finalised, In Progress or Invoiced. The initial setting is Completed. See the table below.
Clinician - set to the appropriate person
The fields in the Items tab are as follows:
Patient - this is a mandatory field
Product - this is also mandatory
Low & High Qty - the low and high quantities of the product. If the product has doses for the patient weight and species, these will be automatically calculated and highlighted in blue until changed, or the editor closed
Fixed Price - the product's fixed price
Low & High Unit Price - the low and high unit prices
Low & High Discount - the low and high discount amounts
Print - this box is displayed if an item can be suppressed in the printed Estimate. This only applies to items with a zero Low and High Total
Low & High Total - these show the low and high totals
The Show Templates and Show Product Types check boxes add columns to display the Product Templates and Product Types of associated products, if any.
For details of the Customer Notes tab, see here.
| Status | Meaning | Set by |
|---|---|---|
| Cancelled | has been cancelled | manually |
| Completed | no further changes expected | initial default |
| Finalised | no further changes allowed | press Finalise |
| In Progress | still being worked on | manually |
| Invoiced | an invoice has been created from this | press Invoice |
Confirm Delete
When you press the Delete button on the Customers|Estimates screen, a confirmation window will appear.
Press OK to confirm or Cancel to abort.
Confirm Finalise
When you press the Finalise button on the Customers|Estimates screen, a confirmation window will appear.
Press OK to confirm or Cancel to abort.
Confirm Invoice
When you press the Invoice button on the Customers|Estimates screen, a confirmation window will appear.
Press OK to confirm or Cancel to abort.
Charges
This screen displays the charges for the current customer - or if there is no current customer, a Select button allowing you to select a customer.
Note that 'charges' are the invoices (or credits or counter-sales) that are currently active, ie not yet Finalised. If you need to look at previously Finalised invoices etc, then you use the Customer|Account screen.

This screen functions like a standard select screen. As well as by date, you can select by:
Type - this can be set to All, Counter Sale, Credit, or Invoice
Status - this can be set to All, Completed, In Progress or On Hold
The item area displays the matching transactions. The column headers are self explanatory. Note that the Description column is always blank. You can click on any column header to sort by that column.
The Items tab displays the line items of the selected transaction, and the details for the selected line item. You can click on any of the column headers except Discount to sort the line items by that column. Click here if you need information on the item fields.
The buttons are as follows:
New - create a new Invoice, Credit or Counter Sale - a confirmation window will appear
Edit - edit the selected transaction
Delete - delete the selected transaction - a confirmation window will appear
Finalise - change the status of the selected transaction to Finalised - a confirmation window will appear. Finalising the transaction locks it from any further changes and moves it the the Customers|Account area
Print - print the selected transaction
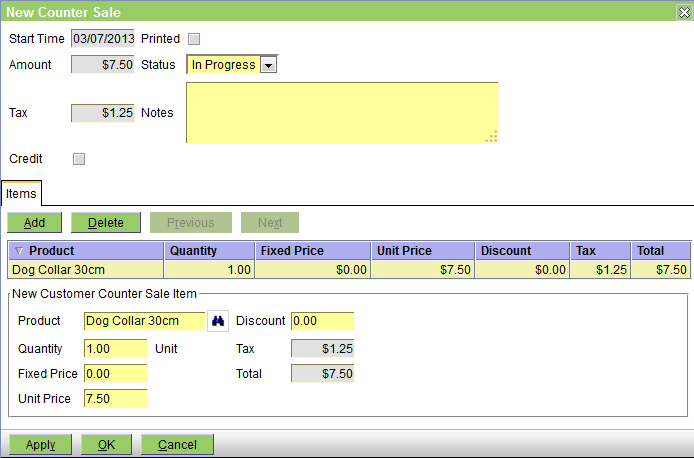
Counter Sale
The screen below is that for a new counter sale, but the same screen is used to edit counter sales.
The screen is a subset of the customer invoice screen and you should consult that for the field details.
Credit
This screen is used to create and edit customer credit notes. It works in exactly the same way as the invoice screen with the following exceptions:
- the Credit check box is always checked
- the Patient field is optional, not mandatory
- the item price cannot be negative
Invoice
This screen is used to create and edit customer invoices.
As well as the standard Apply, OK and Cancel buttons, there are two others:
Completed - pressing this is the same as pressing OK but it also changes the status to 'Completed'
In Progress - pressing this is the same as pressing OK but also setting the status to 'In Progress'
Note that you can still edit and add items to a 'Completed' invoice. In fact the only difference between the two states is that Completed invoices can be automatically finalised by the Reporting|Debtors|End Period processing.
The screen consists of a header section, an item area, a dispensing tab, an investigations tab, and an optional reminders tab.

The header area contains the following fields:
Date - the date on which the invoice was created
Amount - the total (tax-included) amount of the invoice
Tax - the total tax amount
Status - this can be one of In Progress, On Hold, Completed, and Finalised. Note that the normal way to complete or finalise an invoice is by using the Complete and Finalise buttons - but you can can just change the status here.
Notes - any appropriate not text - this will appear on the invoice when it is printed
Reference - any appropriate reference code
Credit - this box will be checked if this is actually a credit - it is never checked for an invoice
Printed - this box indicates whether or not the invoice has been printed
Clinician - the appropriate clinician
Location - this displays the location under which the invoice was created
In the line item area, use the Add button to add a new line item, Delete to delete one.
The line item area table column headings are documented below. Note that all columns except Discount are sortable - for example clicking on the Total column will sort by the line item total amount. Click again to reverse the order.
Selcting a line item (normally by clicking it but also by using the Next and Previous buttons) displays the details of that line item. The are as follows:
The Show Batches, Show Templates and Show Product Types check boxes add columns to display the Batches, Product Templates and Product Types of associated products, if any. If both Show Templates and Show Product Types are displayed, then selecting the Template column will sort on Template, then Product Type, then Date. This is the default behaviour if both columns are displayed. If only one of these two is displayed, then the default sort will be the column and then Date.
Date - the date appropriate to the line item - normally this will be the current date but you could set a earlier date indicating the date of the sale or on which the service was performed
Patient - the name of the patient (this is a mandatory field)
Product - the product - you can use a barcode or the product ID here. If the selected product:
- is a template, it will be expanded to generate an invoice item for each included product
- specifies a Patient Identity, a corresponding Microchip, Pet or Rabies Tag will be displayed and added to the patient
Quantity - the quantity of the item. If the product has doses for the patient weight and species, this will be automatically calculated and highlighted in blue until the quantity is changed, or the editor closed.
You can enter 1, 1.2, 1.23, 1.234 etc but it will be reformatted to show two digits after the decimal point
On Hand - displays the stock on hand for the product. If the selected product has no stock, or the entered Quantity exceeds the available stock, the On Hand quantity will be highlighted red.
If a template is expanded with one or more products that have no stock, or exceed the available stock, a warning message will be displayed.
Fixed Price - this will be set from the fixed price for the product, but you can overide this. If the product has multiple fixed prices (for say Simple, Standard, Complicated) there will be a pull-down so you can select the appropriate one. See also Concepts|Pricing.
Unit Price - this will be set from the unit price for the product, but you can override this
Discount - this will be set from the applicable discounts but you can override this
Print - this box is displayed if an item can be suppressed in the printed Invoice. This only applies to items with a zero Total.
Tax - the line item tax amount
Total - the line item amount (including tax)
Below is the Customer Notes tab. This is used to add/delete and display patient-specific notes.

The fields are as follows:
Patient - the patient name - this is a mandatory field
Note - the note text
Clinician - the clinician - this is optional
Below is the Dispensing tab. This is present for any medication products that have a dispensing label.

The fields are as follows:
Date - the date the invoice item was created
Expiry Date - if a Batch has been selected, this represents the Batch expiry date. If not, you can enter the expiry date of the medication. Note that you can enter a relative date (e.g. 2m for 2 months from today).
Quantity - the quantity. Identical to the invoiced quantity. If the quantity was automatically calculated from a product dose, it will be highlighted in blue, until the quantity is changed, or the editor closed.
Label - the dispensing label - you can use the Print Label button to print this
Clinician - the clinician
Batch - the product batch. If selected, this determines the Expiry Date. The Batch dropdown displays all active batches of the medication at the current stock location. The batch with the earliest expiry date is shown first.
Below is the Investigations tab. This is always shown so that you can manually initiate an investigation. Normally investigations are linked to a product, so that when you enter the invoice line item 'XYZ Test' the associated investigation is automatically started. Investigations are normally managed (and initiated) via the Patients|Medical Records screen. See Patients|Medical Records|Investigation for details on the working of this tab.

Below is the Reminders tab. This is shown if the product being charged has reminders.

Invoice Orders and Returns
The Invoice Orders and Returns window allows orders and returns to be selected for invoicing.

Table
The table displays the customer orders and returns, and their corresponding line items. The columns are as follows:
| Tick | If selected, indicates to invoice the order/return |
| Type | The type of the order/return |
| Status | The order/return status |
| Date | The date that the order/return was created |
| Clinician | The clinician responsible for the order/return, if any |
| Patient | The order/return patient |
| Product | The order/return product |
| Quantity | The order/return quantity |
| Invoice Quantity | The quantity of the original invoice item, if the order/return is related to an existing invoice. |
Actions
The following actions may be performed:
| OK | Invoices all rows selected with a tick. |
| Edit | Edits the selected order or return. Double clicking a row also edits it. |
| Cancel | Closes the window without invoicing any orders or returns. |
Confirm Delete
When you press the Delete button on the Customers|Charges screen, a confirmation window will appear. Press OK to confirm or Cancel to abort.
Confirm Finalise
When you press the Finalise button on the Customers|Charges screen, a confirmation window will appear. Press OK to confirm or Cancel to abort.
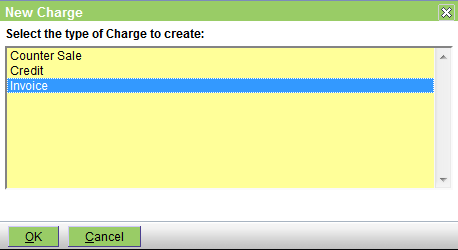
Confirm New
This window allows you to select the type of transaction to be created. Select the required one and press OK, else Cancel to abort. Note that since Invoice is the default selection, and OK the default button, you can simply press the Enter key to create a new invoice.
Confirm Payment
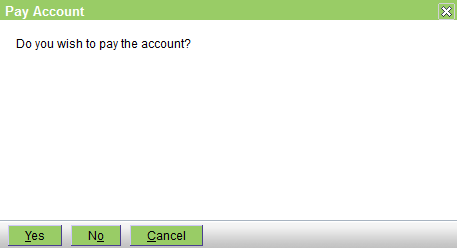
This screen is displayed after you finalise an invoice. If the account is to be paid now, click Yes, if not click No. Clicking Cancel aborts the operation - the invoice will stay as finalised, but if you were doing a Check-Out, the check-ot operation will be aborted.
Payments
This screen displays the payments for the current customer - or if there is no current customer, a Select button allowing you to select a customer.
Note that 'payments' are the payments (or refunds) that are currently currently active, ie not yet Finalised. If you need to look at previously Finalised payments etc, then you use the Customer|Account screen.
It is unusual for this screen to display any transactions because both Payments and Refunds are by default created with status Finalised and thus are moved immediately to the Account screen.
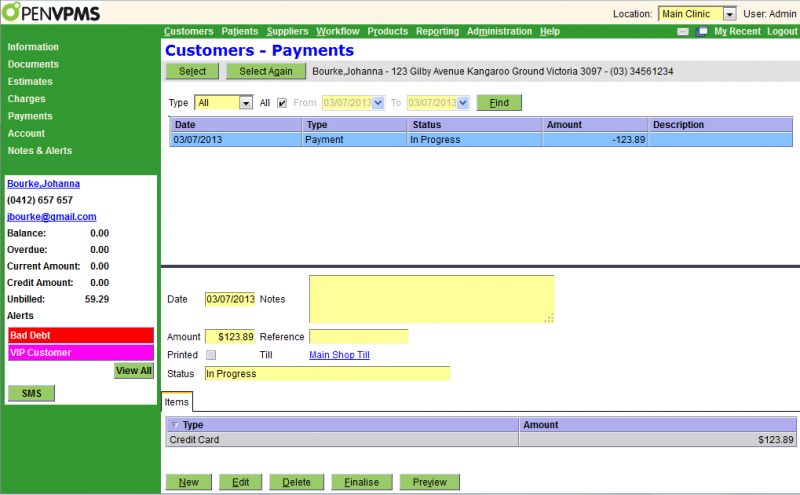
This screen functions like a standard select screen. As well as by date, you can select by:
Type - this can be set to All, Payment or Refund
The item area displays the matching transactions. The column headers are self explanatory. Note that the Description column is always blank. You can click on any column header to sort by that column.
The Items tab displays the line items of the selected transaction, and the details for the selected line item. You can click on any of the column headers except Discount to sort the line items by that column. If you need information on the item fields click here for payments and here for refunds.
The buttons are as follows:
New - create a new Payment or Refund - a confirmation window will appear
Edit - edit the selected transaction
Delete - delete the selected transaction - a confirmation window will appear
Finalise - change the status of the selected transaction to Finalised - a confirmation window will appear. Finalising the transaction locks it from any further changes and moves it the the Customers|Account area
Print - print the selected transaction
Create/Edit Payment
This is the screen used to create and edit customer payments.
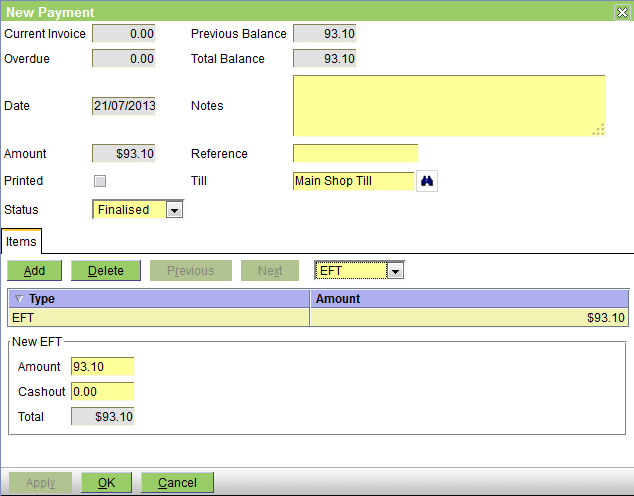
The header fields are as follows:
Current Invoice - the amount of the current invoice (in the above screen shot, there isn't one)
Overdue - the customer's current overdue balance
Date - the date on which the payment was created
Amount - the amount of the payment - this is the sum of the line item amounts
Printed - this checkbox will be checked when the payment is printed
Status - is initially set to Finalised, and can also be set to In Progress or On Hold
Previous Balance - the customers balance at the end of the last accounting cycle
Total Balance - the total balance owed by the customer
Notes - any relevant notes
Reference - any appropriate reference number/code
Till - the till into which the money is to be paid
The Items tab allows you to add, delete, view and edit the item items. The pull-down allows you to select the payment type to be one of Cash, Cheque, Credit Card, EFT, Other, or Discount. Note that the last is a 'negative' payment - you can use this payment type to include a discount for the customer.
The table shows the line items - normally there will be only one.
The item detail area changes depend on the payment type. The picture above shows EFT. Its fields are:
Amount - this will default to the amount owed
Cash Out - enter any cash out amount
For Cash it is as follows:
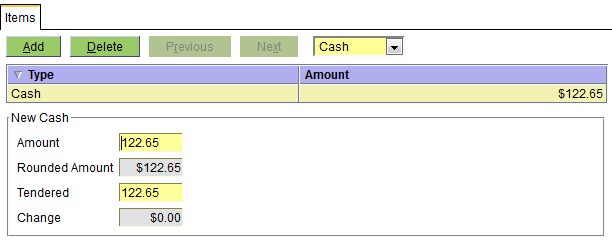
The fields are as follows:
Amount - this will default to the amount owed
Rounded Amount - this is the rounded equivalent of Amount using the minimum cash denomination and rounding mode set for the currency - see Administration|Lookups|Currency
Tendered - the amount tendered
Change - this will be Tendered less Rounded Amount
For Cheque it is as follows:
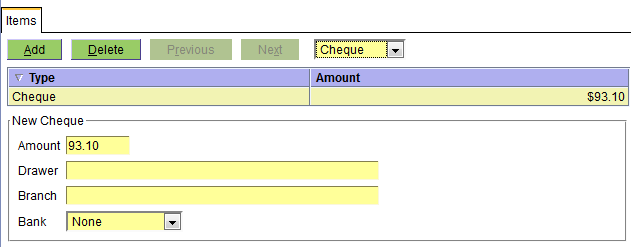
The fields are as follows:
Amount - this will default to the amount owed
Drawer - the name of the drawer of the cheque
Branch - something that identifies the branch of the bank. For Australian usage this is the BSB (Bank State Branch) number.
Bank - select the bank using the pull-down. The values allowed are set via Administration|Lookups|Bank.
For Credit Card it is as follows:

The fields are as follows:
Amount - this will default to the amount owed
Credit Card - select the credit card using the pull-down. The values allowed are set via Administration|Lookups|Credit Card.
For Other it is as follows:

The fields are as follows:
Amount - this will default to the amount owed
Payment Type - select the payment type using the pull-down. The values allowed are set via Administration|Lookups|Custom Payment Type.
For Discount it is as follows:
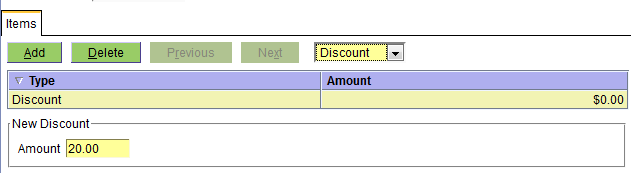
The fields are as follows:
Amount - the discount amount being given
Create/Edit Refund
This is the screen used to create and edit customer refunds.

The header fields are as follows:
Current Invoice - the amount of the current invoice (in the above screen shot, there isn't one)
Overdue - the customer's current overdue balance
Date - the date on which the payment was created
Amount - the amount of the payment - this is the sum of the line item amounts
Printed - this checkbox will be checked when the payment is printed
Status - is initially set to Finalised, and can also be set to In Progress or On Hold
Previous Balance - the customers balance at the end of the last accounting cycle
Total Balance - the total balance owed by the customer
Notes - any relevant notes
Reference - any appropriate reference number/code
Till - the till into which the money is to be paid
The Items tab allows you to add, delete, view and edit the item items. The pull-down allows you to select the payment type to be one of Cash, Cheque, Credit Card, or EFT.
The table shows the line items - normally there will be only one.
The item detail area changes depend on the payment type. The picture above shows EFT. Its fields are:
Amount - this will default to the amount owed to the customer or 0.00 if nothing is owing
For Cash it is as follows:

The fields are as follows:
Amount - this will default to the amount owed to the customer or 0.00 if nothing is owing
Rounded Amount - this is the rounded equivalent of Amount using the minimum cash denomination and rounding mode set for the currency - see Administration|Lookups|Currency
For Cheque it is as follows:

The fields are as follows:
Amount - this will default to the amount owed to the customer or 0.00 if nothing is owing
Drawer - the name of the drawer of the cheque
Branch - something that identifies the branch of the bank. For Australian usage this is the BSB (Bank State Branch) number.
Bank - select the bank using the pull-down. The values allowed are set via Administration|Lookups|Bank.
For Credit Card it is as follows:
The fields are as follows:
Amount - this will default to the amount owed to the customer or 0.00 if nothing is owing
Credit Card - select the credit card using the pull-down. The values allowed are set via Administration|Lookups|Credit Card.
For Other it is as follows:

The fields are as follows:
Amount - this will default to the amount owed to the customer or 0.00 if nothing is owing
Payment Type - select the payment type using the pull-down. The values allowed are set via Administration|Lookups|Custom Payment Type.
For Discount it is as follows:

The fields are as follows:
Amount - the discount amount being refunded
Confirm Delete
When you press the Delete button on the Customers|Payments screen, a confirmation window will appear. Press OK to confirm or Cancel to abort.
Confirm Finalise
When you press the Finalise button on the Customers|Payments screen, a confirmation window will appear. Press OK to confirm or Cancel to abort.
Confirm New
This window allows you to select the type of transaction to be created. Select the required one and press OK, else Cancel to abort. Note that since Payment is the default selection, and OK the default button, you can simply press the Enter key to create a new payment.

Account
This screen displays the account for the current customer - or if there is no current customer, a Select button allowing you to select a customer.
Note this screen displays the completed financial transactions (ie invoices, payments, etc etc). If you need to look at invoices and payments that are in progress, then you need to use the Customers|Charges or Customers|Payments screens. See also Concepts|Accounting for background information.

The top half of this screen functions like a standard select screen. As well as by date, you can select by:
Type - this can be set to All (ie all transaction types), or one of the various transaction types (just that type)
The bottom half of the screen shows the selected transaction (in the above example a Counter Sale), as well as any line items in the transaction.
The display data will change for each transaction type. If you need help with the meaning of the fields, consult the Charges, Payments and Adjustments documentation.
The Buttons are as follows:
Adjust - this allows you to create an adjustment transaction. A confirmation window will open to allow you to select the transaction type.
Reverse - this will generate a transction that will reverse the effects of the selected one. A confirmation window will appear, and if you OK this, the appropriate transaction will be created. This will have its Notes field set to identify the reversed transaction - eg "Reversal of Invoice 123456". Note that you cannot reverse a transaction that has previously been reversed - if you do attempt to do this a message will be displayed giving the Id of the reversing transaction.
By default, when reversing a transaction in the current accounting period, both the reversing and reversed transactions will be flagged as hidden - this option is shown on the confirmation window. However, when reversing a transaction in a prior period, the reversing and reversed transactions will not be hidden - BUT if necessary you can use the Hide button to manually hide them (but this may/will cause 'unbalanced hidden transaction' problems when you print the statement). See also Concepts|Accounting|Hidden Transactions.
Print - prints the selected transaction
Check - checks the customer's balance.
Hide - sets the 'Hide' flag of the selected transaction. The button will only be displayed if the transaction can be hidden, ie it has been reversed, or be a reversal. The transaction will be hidden in customer statements.
Unhide - unsets the 'Hide' flag of the selected transaction. The button will only be displayed if the transaction is flagged as 'Hidden'. The transaction will be displayed in customer statements.
Note that the Check, Hide, and Unhide buttons will not be displayed unless the user is a member of the Administrator category - see Concepts|Users.
Adjustments
This is the upper level page for the various adjustment transactions.
Note that you can only create an Initial Balance transaction for an account that has no other tranactions.
Bad Debt Adjustment
This screen is used to create a Bad Debt Adjustment.
The fields are as follows:
Date - the date of the transaction - defaults to the current date
Amount - the tax-included amount of the bad debt adjustment
Tax - this shows the tax included in the above amount
Status - the is set to POSTED and cannot be changed
Notes - any applicable notes
Reference - any applicable reference number/code
Credit - this is always unchecked
Printed - this box will be ticked after the transaction is printed
Credit Adjustment
This screen is used to create a Credit Adjustment.
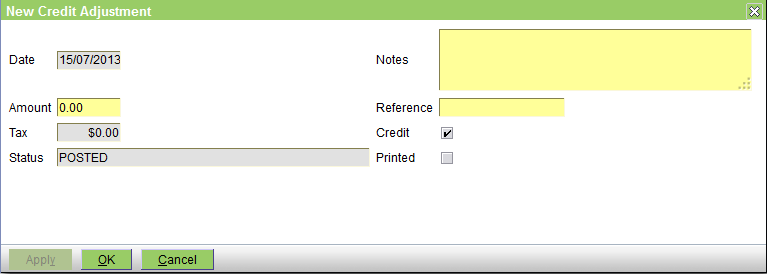
The fields are as follows:
Date - the date of the transaction - defaults to the current date
Amount - the tax-included amount of the credit adjustment
Tax - this shows the tax included in the above amount
Status - the is set to POSTED and cannot be changed
Notes - any applicable notes
Reference - any applicable reference number/code
Credit - this is always checked
Printed - this box will be ticked after the transaction is printed
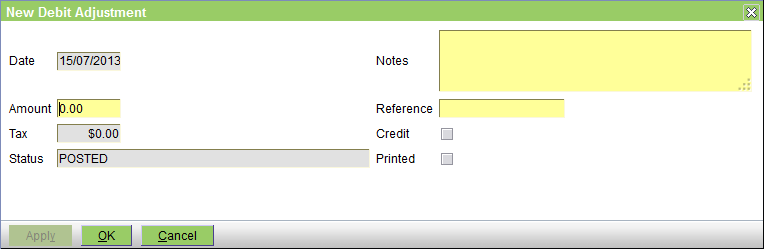
Debit Adjustment
This screen is used to create a Debit Adjustment.

The fields are as follows:
Date - the date of the transaction - defaults to the current date
Amount - the tax-included amount of the debit adjustment
Tax - this shows the tax included in the above amount
Status - the is set to POSTED and cannot be changed
Notes - any applicable notes
Reference - any applicable reference number/code
Credit - this is always unchecked
Printed - this box will be ticked after the transaction is printed
Opening Balance
This screen is used to create an Opening Balance transaction. You only need this if, for some reason, you want to bring a new customer on board with a non-zero opening balance.

The fields are as follows:
Date - the date of the transaction - defaults to the current date
Amount - the tax-included amount of the opening balance
Tax - this shows the tax included in the above amount
Status - the is set to POSTED and cannot be changed
Notes - any applicable notes
Reference - any applicable reference number/code
Credit - this is always checked
Printed - this box will be ticked after the transaction is printed
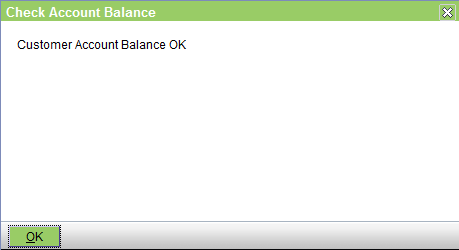
Balance Check
When you press theCheck button on the Customers|Account screen, one of the following windows will be displayed:
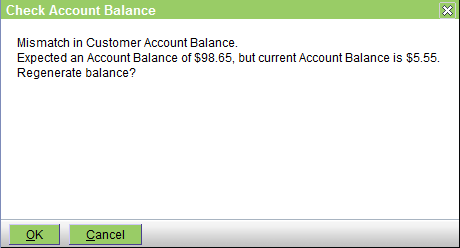
Press OK to regenerate the balance, or Cancel to abort.
If there is no problem, then the window will be displayed as follows - press OK to close it.
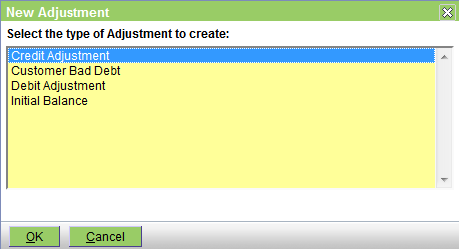
Confirm Adjust
This window allows you to select the type of adjustment transaction to be created. Select the required one and press OK, else Cancel to abort.
Note that you can only create an Initial Balance transaction for an account that has no other tranactions. The 'Initial Balance' option will not be present if the customer has other accounting transactions.
Confirm Reverse
When you press the Reverse button on the Customers|Account screen to reverse a transaction, a confirmation window will appear.

The fields are as follows:
- Notes - notes to include in the reversal. This defaults to "Reversal of <Transaction Type> <Transaction Id>"
- Reference - the reversal reference. This defaults to the identifier of the transaction being reversed
- Suppress transaction and reversal in customer statement - this option is displayed if the transaction being reversed is not hidden, and not from a prior statement. If selected, it enables transactions and their reversals to be hidden in customer statements.
Press OK to confirm or Cancel to abort.
Communication
This screen displays the Communication with and Alerts for, the current customer - or if there is no current customer, a Select button allowing you to select a customer.
A customer can have any number of Communications and Alerts. If there are active Alerts then these are also shown in the Customer information panel.
Communication
Communications are used to log:
- notes
- emails
- SMS
- phone calls
These can be logged manually, or automatically via the Practice option Log Communication.
When automatic logging is enabled:
- ad-hoc email and SMS messages related to a customer will be logged.
The patient will be included, if one is present - email and SMS messages will be logged during reminder processing
Reminders:- listed for phone calls will be logged as a Phone communication
- printed for mailing will be logged as a Mail communication
Automatic logging does not occur during statement processing.
The Communication screen is as follows:

The top half of the screen is a select screen. In addition to the date range, you can select by:
| Patient | If no patient is selected, all communication with the customer is displayed. If a patient is selected, only communication involving that patient is displayed |
| Type | Determines which communication types to display. Defaults to All. |
The table shows the matching communications, and the bottom half of the screen, the details of the selected communication.
The buttons are:
| New | Create a new Note |
| Log | Displays the New Communication Log window to log communication with a customer |
| Edit | Edit the selected communication |
| Delete | Delete the selected communication |
New Communication Log
The Log button displays a New Communication Log window, to select the type of log to create.
Alerts
The Alerts screen is as follows:

The top half of the screen is a select screen. As well as the date, you can select by:
Alert - either all or one of the alert types as defined via Administration|Lookups|Customer Alert Type
Status - the status of the alert, either All, Completed, or In Progress
The table shows the matching alerts, and the bottom half of the screen, the details of the selected alert. For details of the fields see Create/Edit Alert.
Note that this screen shows the customer alerts - it does not show those alerts set via the Customer Account Type. As you can see in the above, this customer is a VIP customer and thus shows the mauve VIP Customer alert in the left panel. However, you can see that this is not listed as one of the current customer alerts.
Confirm Delete
When you press the Delete button on the Customers|Communication screen, a confirmation window will appear.
Press OK to confirm or Cancel to abort.
Create/Edit Alert
This screen is used to create and edit customer alerts.

The fields are as follows:
Date - the start date of the alert - defaults to the current date
End Date - the end date of the alert
Alert Type - select from those available - these are set via Administration|Lookups|Customer Alert Type
Priority - this displays the priority of the alert - see above link
Reason - a short version of the Notes text
Author - this defaults to your user name, but can be set to that of any user
Notes - the long version of the reason for the alert
Status - can be either In Progress or Completed
Create/Edit Email
This screen is used to create and edit customer Email communications.
Note that these are used to log emails to/from a customer, or about a customer's pets, rather than send an email. Normally (assuming that you have 'Log Communication' set for the Practice), you do not have to create these entries - the system does this automatically.

The fields are as follows:
| Subject | the subject of the email |
| To | identifies who the email was addressed to |
| Cc | identifies who the email was Cc'ed to |
| Bcc | identifies who the email was Bcc'ed to |
| Patient | the patient that the note is about, if any |
| Reason | the reason for the note. The available reasons are configured via Administration|Lookups|Customer Communication Reason |
| Message | the email message |
| Note | additional notes about the email |
| Atttachments | a list of the names of attachments that were sent with the email |
Create/Edit Mail
This screen is used to create and edit customer Mail communications.
Note that these are used to log posted communications to/from a customer, or about a customer's pets, rather than actually send an mail.

The fields are as follows:
| Subject | the subject of the mail |
| To | identifies who the mail was addressed to |
| Patient | the patient that the mail is about, if any |
| Reason | the reason for the mail. The available reasons are configured via Administration|Lookups|Customer Communication Reason |
| Message | the mail message |
| Note | additional notes about the mail |
Create/Edit Note
This screen is used to create and edit customer Notes.

The fields are as follows:
| Subject | the subject of the note |
| Patient | the patient that the note is about, if any |
| Reason | the reason for the note. The available reasons are configured via Administration|Lookups|Customer Communication Reason |
| Note | the actual note text |
Create/Edit Phone
This screen is used to create and edit customer phone communications.
These are used to log phone calls to/from a customer, or about a customer's pets.

The fields are as follows:
| Subject | the subject of the phone call |
| To | identifies the number the phone call was made to |
| Patient | the patient that the phone call was about, if any |
| Reason | the reason for the phone call. The available reasons are configured via Administration|Lookups|Customer Communication Reason |
| Message | the details of the call |
| Note | additional notes about the call |
Create/Edit SMS
This screen is used to create and edit customer SMS communications.
Note that these are used to log SMS messages to/from a customer, or about a customer's pets, rather than send an SMS. Normally (assuming that you have 'Log Communication' set for the Practice), you do not have to create these entries - the system does this automatically.

The fields are as follows:
| Subject | the subject of the SMS |
| To | identifies who the SMS was addressed to |
| Patient | the patient that the SMS is about, if any |
| Reason | the reason for the SMS. The available reasons are configured via Administration|Lookups|Customer Communication Reason |
| Message | the SMS message |
| Note | additional notes about the SMS |
SMS
This is the screen used to compose and send an SMS message to a customer. For background, see Concepts|SMS.

The fields are as follows:
Phone - the phone number to which the SMS will be sent. If the customer has multiple phone contact numbers that are SMS enabled, then there will be a pull-down list for you to select from.
Message - the text of the SMS message. The maximum length depends on the maximum number of parts set for your SMS provider. The counter on the top of the box (138/2 in the above sample) shows how many more characters can be entered in the current part of the message and how many parts are being used. So 138/2 indicates that this will require a 2 part message and that 138 characters remain in the 2nd part. It you use a langauge with multi-byte characters (eg "東區動物醫院溫馨提示:Ngau Ngau的預約時間為今天10:30 AM 如需更改或取消預約請致電3456 7890 謝謝") then the counter will not be accurate. However, if the message gets too long, when you attempt to send it, you will get an error message like "Failed to validate: SMS is too long: 7 parts were entered but only 3 are supported"
Press the OK button to send the SMS.
Note that you can use macros when composing the message. You may find the following expression to be useful when building the macro called say 'smsr' using Administration|Lookups|Macros
concat($patient.name,' is now due. Pls call ",party:getTelephone($location),' for an appointment. Thanks ',$practice.name) You could also create suitable macros for each vaccination, eg rg6 for 'Reminder: G6 Vaccination - "
Then you can simply type rg6 smsr into the SMS message text and press Enter to expand it to generate the text:
Reminder: G6 Vaccination - Muffet is now due. Pls call 9123 4567 for an appointment. Thanks Pets-R-Us
Note however, that the above macro will fail to expand if there is no current patient.
If you are using a macro that expands to a large amount of text - for example:
concat('Reminder: ',$patient.name,'.
Your appointment for ',$appointment.reason,' is on ',date:format($appointment.startTime,
"EEEE dd/MM/yy 'at' h:mma"),
'
Pls call ',party:getTelephone($location),' if you cannot attend. Thanks')
there is a possibility that the resulting text is longer than the maximum allowed. If this happens, then what you entered as the macro (eg @apr - for appointment reminder) will disappear, but the SMS text will be blank. If you press OK, then you will get a message like "Failed to validate: SMS is too long: 4 parts were entered but only 2 are supported".
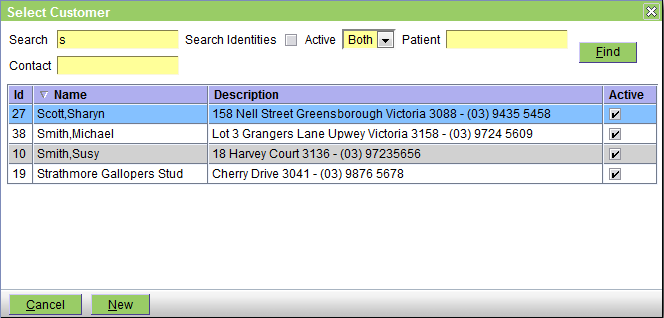
Select
This is the customer select screen. The picture below shows the 'empty' screen. If you had previously done a customer selection, and had pressed the 'Select Again' button, this will show the results of your previous selection.

If the required customer is displayed, just click it to select it.
Enter the search criteria and click the Find button, or press the Enter key or Alt-F. The search is case insensitive (ie smith, SMITH, and Smith will all find Smith), and you can enter full or partial information (see using wildcards).
To search by customer name, enter the full or partial name in the Search field. You can include the first name of the customer using the format lastname,firstname eg 'smith,adam'. NOTE that there is no space, ie 'smith adam' will not work, nor will 'smith, adam' or 'smith , adam'.
Remember that the 'customer name' will in fact be the Company Name if one is defined. That is, if you have a customer with Last Name Bloggs and Company Name JB Enterprises, then you will not be able to find this customer by entering bloggs in the Search field - but jb will find it.
To search by patient name, enter the full or partial name in the Patient field.
To search by customer contact (ie phone, address, email), enter the full or partial information in the Contact field. Note that whereas the customer and patient name searches are 'starts with' searches, the contact search is a 'contains' search so entering 'gmail' will find all customers with a gmail address.
You can use one or more of the Search, Patient, and Contact fields. ie entering smi, rov, and 123 respectively will find all customers with a name starting 'Smi', who have a pet with a name starting 'Rov', and a phone number, location, or email address containing '123'.
To include deactivated customers, set the 'Active' pulldown to 'Both'.
To search by Identity or ID rather than name, click the 'Search Identities' checkbox.
The search results will be displayed as shown as follows:
For more information on how select screens work, click here.